
Facebook Ads have been the driving factor for my wife’s success as a fantasy author, earning six figures per year from her 4 books.
But I know from all the authors I speak to that Facebook Ads aren’t everyone’s cup of tea (excuse the English, I’m British!).
Many authors struggle to break even with Facebook Ads, let alone make a profit.
But if you are persistent enough, and believe you have written great books, that have lots of social proof (i.e. great reviews and ratings), with an enticing blurb, a fair price, and a professional, on-genre book cover, there’s zero reason why Facebook Ads can’t work for you too.
Facebook Ads are an incredible opportunity for authors to position their books in front of thousands of readers every single day, at a cost that is more affordable than you might think.
Now, I hear you…
“…but readers aren’t looking for books on Facebook; they’re looking on Amazon!”
And whilst there is certainly an element of truth to that, there is no doubt that Facebook Ads can sell books; a lot of books.
If you’re in this self-publishing business for the long haul and want to build a thriving career as an author, then Facebook Ads is a tool you should seriously consider using.
And in today’s article, I’m going to walk you through my (unconventional, slightly controversial) Facebook Ads strategy, which has allowed me to scale my wife’s Facebook Ads to a point where we are spending four figures per month and earnings five figures per month in royalties, with a 2x return on Ad Spend.
- The Hierarchy of Facebook Ads
- My Unconventional Facebook Ads Strategy
- What Truly Moves The Needle With Facebook Ads
- How to test Your Facebook Ads Through Machine-Learning
- How to Optimize Your Facebook Ads
- How to scale your Facebook Ads
Chapter 1
The Hierarchy of Facebook Ads
Before diving into the weeds of strategy, launching, optimization, and scaling, I feel it’s important to have at least a basic understanding of the Facebook Ads hierarchy; how all the pieces fit together.

Before diving into the weeds of strategy, launching, optimization, and scaling, I feel it’s important to have at least a basic understanding of the Facebook Ads hierarchy; how all the pieces fit together.
Without this knowledge, it’s no different from building a house and not knowing what the foundations are made of!
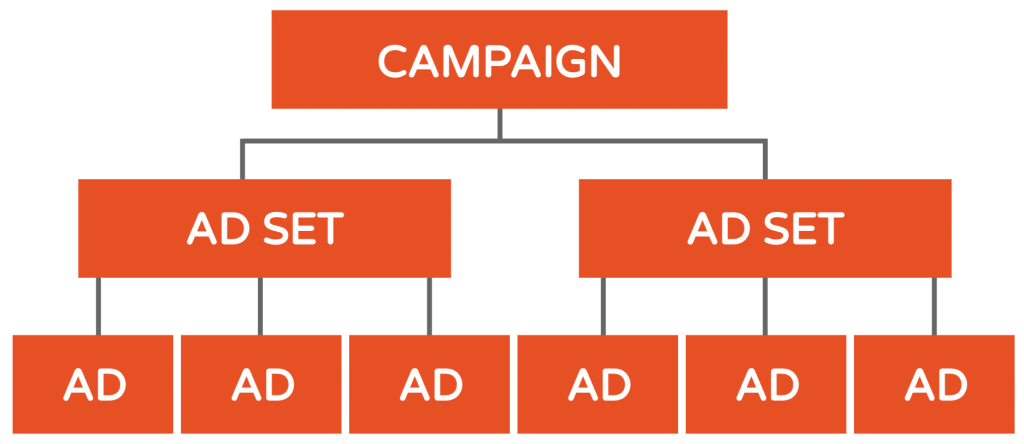
The three levels to the Facebook Ads hierarchy, which are:
- Campaign
- Ad Set
- Ad
Each level intertwines with the other and has a very specific purpose in the overarching functioning of your Facebook Ads as a whole.
My brain works better when I can see things visually, so, if you’re wired the same way, here’s a visual representation of the Facebook Ads hierarchy, and how each of the levels mentioned above intertwine with one another.
The Campaign Level
At the Campaign level, you tell Facebook’s algorithm what you want your Campaign to achieve, be it clicks, sales, engagement, leads, etc. This is known as your objective.
Facebook will then optimize the entire Campaign (including Ad Sets and Ads within your Campaign), towards achieving your desired objective.
When choosing an objective for your Facebook Ads campaign, you have 6 options to choose from:
- Awareness
- Traffic
- Engagement
- Leads
- App Promotion
- Sales
As most authors predominantly send readers from Facebook Ads to their book product page(s) on Amazon, which is what I recommend, I always stick to using the Traffic objective,
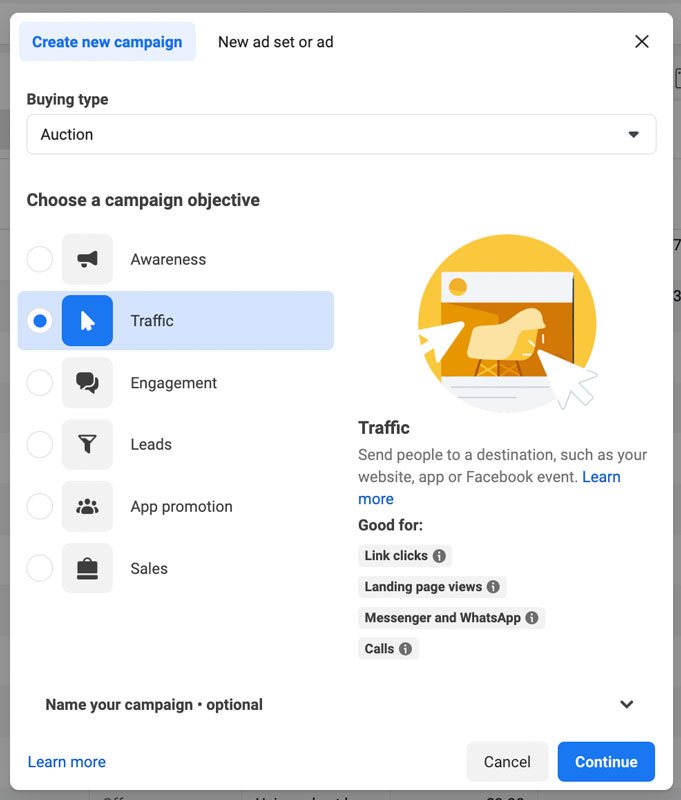
This will tell Facebook’s algorithm you want as many people as possible to click on your Ad and visit your book product page on Amazon (or another retailer).
To do this, Facebook is going to search the millions of data points it has on every person in their audience (user base) and pick out those who have a history of clicking on Ads, but more specifically, have previously clicked on Ads like yours.
Now, you may be thinking Sales would be a better objective here as we’re selling books.
But this option requires something known as the Facebook Pixel; a piece of code you place on your website that allows Facebook to “talk” directly to your website and report sales within your Facebook Ads dashboard.
Unfortunately, we don’t own Amazon and therefore have no way of placing the Facebook Pixel code there!
If you sell books direct on your own website or store, then you can use the Facebook Pixel, but that is another topic for another day.
In this article, we’re focusing purely on sending readers directly from Facebook Ads to Amazon (or another retailer).
Also at the Campaign level, you set a daily budget (how much you’re prepared to spend each day on a specific Campaign). You can have up to 10,000 Campaigns in your Facebook Ads, and each Campaign’s budget acts independently of the other Campaigns in your account.
Thankfully, with the strategy I’ll be sharing with you later on in this article, you won’t need to worry about hitting that 10,000 Campaign limit – ever!
My strategy relies heavily on harnessing the power of Facebook’s algorithm and machine learning capabilities. So, this is why I turn on something known as Advantage campaign budget.
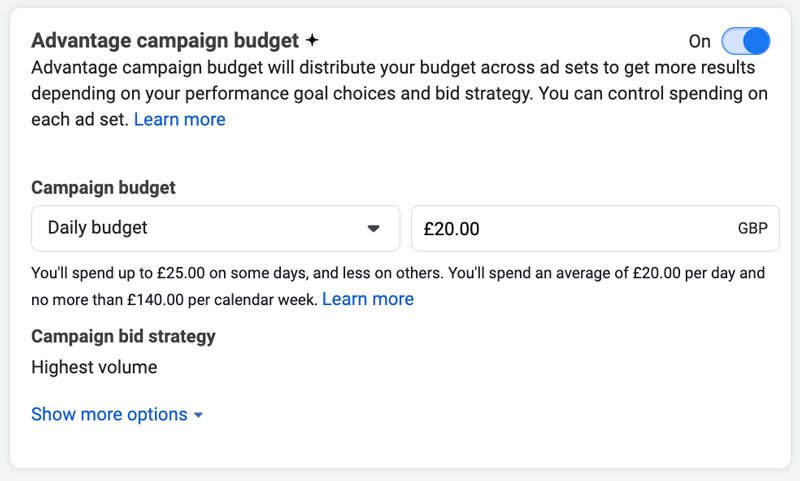
When you turn Advantage Campaign Budget on, you are allowing Facebook to decide how much budget each Ad Set within the Camapign receives out of the total Camapign budget.
Automatically, Facebook will push more budget towards the best-performing Ad Sets, and less budget towards those Ad Sets that aren’t performing too well.
This is something you would have to do manually if you weren’t using Advantage Campaign Budget.
So just this one strategy alone will save hours and hours of time deciding how much to spend on each Ad Set – with this strategy; Facebook will decide on budget allocation on your behalf.
In terms of recommended daily budget, I would suggest $20 per day, ideally, but at an absolute minimum, $10 per day. Any less than this, and you’re really going to struggle to gain traction and collect any sort of meaningful, statistically significant data. And if you do, it’s going to take you months to do so.
I would much rather you collect data within a short period of time (5-7 days), make decisions on that data, figure out what works, what doesn’t work, and move on.
The Ad Set Level
The Ad Set level is where things get interesting, as this is where you decide who to show your Ads to and where most authors get the most excited!
However, as I’ll reveal shortly, my Facebook Ads strategy involves zero targeting, so I’m afraid you’ll be a little disappointed if you’re expecting me to show you which targeting options you should use to advertise your books!
On the other side of things though, you definitely won’t be disappointed at the results my targeting strategy can deliver for you.
Alas, I digress… More on this later.
Also at the Ad Set level, you’ll find options for deciding where to show your Ads within Facebook’s ecosystem.
Facebook, whose parent company, Meta, also owns other platforms, such as Instagram and WhatsApp, allows you to show your Facebook Ads on many of these platforms if you so wish.
The placement options include, but aren’t limited to:
- Facebook Feed
- Instagram Feed
- Messenger
- Instagram Stories
- Facebook Reels
- Marketplace
- And more …
But my advice to authors is to restrict your Facebook Ads to only show on the Facebook Feed.
I’ve rigorously tested all the other placements, and none of them come close to the performance of the Facebook Feed.
Coming back to the targeting, then, here are the options you have:
Demographics:
- Location: Country, state, postcode/zip code
- Gender: Men or women or both
- Age: 18 to 65+ (and everything in between)
Detailed Targeting (Interests and Behaviors)
- Authors (traditionally published only)
- Book Titles
- TV Shows
- Films
- Hobbies
- People (if they’re well-known enough)
- Interests (e.g. Amazon Kindle, Reading)
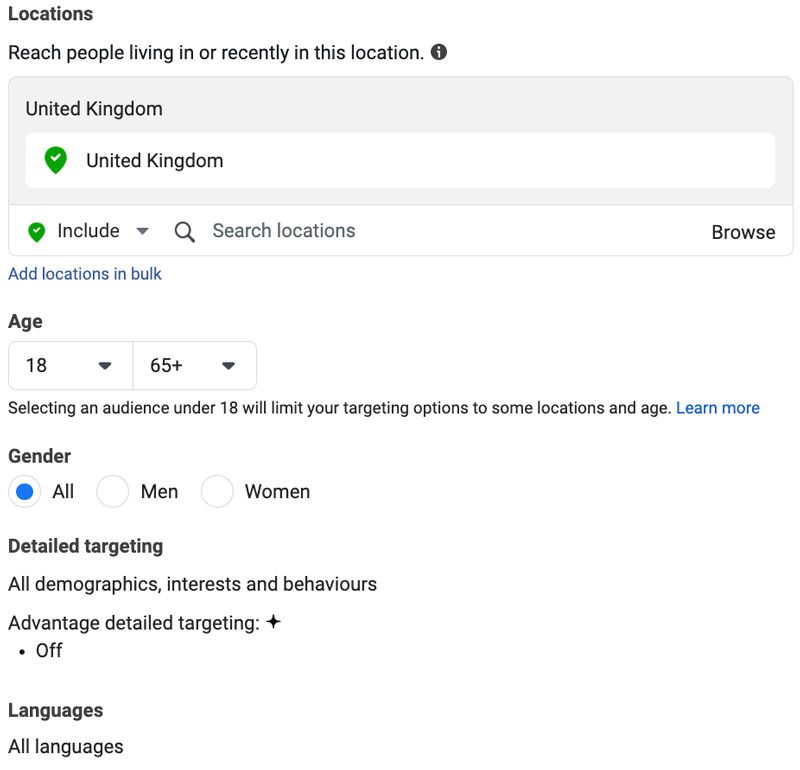
The screenshot above shows the targeting options you have with your Facebook Ads at the Ad Set level (Demographics and Detailed Targeting).
The Ad Level
The final level of Facebook Ads is the ads themselves; these are the actual ads people will see on their Facebook Feed.
Your Facebook Ad is made up of five key elements:
- (Media) Image or Video
- Primary Text
- Headline
- Description
- Call-To-Action Button
Below, you’ll see an example Facebook Ad with each of these elements labeled:

Of the 5 elements here, there are just 3 that will have the biggest impact on how your Facebook Ads perform:
- Image (because this will stop the scroll)
- Headline (should provide clarity and context to the image)
- Primary Text (expand on the image and headline and entice readers to click on your Ad)
Of the 3 levels of the Facebook Ads hierarchy we’ve covered here, the Ads themselves are, without a doubt, the most important; they are what will make or break your Facebook Ads performance as a whole.
It’s not the targeting, as many authors believe.
It’s the Ads.
Get these right, and you can drive 100’s, even 1000’s of sales every single month. Get them wrong, and you could easily throw a lot of money down the drain.
I don’t say this to scare you away from Facebook Ads.
On the contrary; I want you to go into Facebook Ads armed with the knowledge of what is truly going to move the needle for you; the Ads.
Also, I want to set your expectations upfront that you will need to test many different images and copy (text) with your Facebook Ads until you find the right formula for your books.
As we’ve covered in this section, the overarching structure and hierarchy of Facebook Ads is very simple on the surface, with three specific levels:
- Campaign
- Ad Set
- Ad
Understanding this simple structure is going to be incredibly beneficial when you begin building out your Facebook Ads, because it’s going to make the process more straightforward and efficient.
Chapter 2
My Unconventional Facebook Ads Strategy
As I covered earlier, the most exciting part of Facebook Ads for authors is the targeting.
Many of them get as excited as a kid in a sweet shop when looking through all the different targeting options:
- Authors (traditionally published only)
- Book Titles
- TV Shows
- Films
- Hobbies
- People (if they’re well known enough)
- Interests (e.g. Amazon Kindle)
And this is where my strategy differs from 99% of everything you’ve heard about Facebook Ads in the author community…
I don’t use any of these targeting options!
The only targeting I employ with Facebook Ads is the demographics:
- Location
- Age
- Gender
That’s it.
I call this strategy Unrestricted Targeting.
I let Facebook do the targeting, whilst I focus on the Ad Creative.
“But how does Facebook know who to show your Ads to”, I hear you ask?
And this is a fair point.
Facebook knows who to show your Ads to, or at least it learns to in time, by looking at the specific content within your Ad Creative itself.
Facebook’s algorithm looks at:
- The words used in your Primary Text
- The words used in your Headline
- The words used in your Description
- The style of image
- Who or what is in your image – male or female, animal, landscape, object, etc.
- Emotions of people in your image (if applicable)
- And many other data points besides
From this information, Facebook knows who is likely to respond well to your Ads based on each of its individual user’s past behavior.
I know, pretty scary, right?
But it works.
I haven’t used any Detailed Targeting in my Facebook Ads since 2022, and results have improved significantly:
- Conversion rates of my Facebook Ads have doubled in the USA and tripled in the UK
- ROAS (Return on Ad Spend) has improved
- Overall profit has increased
And to top it all off, I’m not spending time testing new and different audiences each week – which further improves ROAS (Return on Ad Spend).
So, if you’ve been struggling with finding suitable Detailed Targeting options for your Facebook Ads, or seem to have exhausted all avenues and can’t find any new targeting ideas, you no longer need to worry about it, because you don’t need to use Detailed Targeting in any way, shape or form.
The beauty of Unrestricted Targeting is that you’ll find it cheaper, more stable, and more scalable than anything you could do with Detailed Targeting.
A fair warning though…
In the beginning, you may find that Unrestricted Targeting doesn’t look as good as your Detailed Targeting campaigns. And that’s totally normal; it’s to be expected.
When you’re not giving Facebook any restrictions, as you are with Detailed Targeting, it just takes their algorithm a little longer to find the right audience for your Ads.
But stick with the process for at least 30 days, at the absolute minimum, and like myself and many other authors I’ve shared this strategy with, your results will speak for themselves.
If you’re skeptical about this strategy, I completely understand. I was exactly the same.
I didn’t think there was any chance this was going to work, but the data doesn’t lie.
Have faith in the algorithms and you will be rewarded.
Testing Your Facebook Ads Through Machine-Learning
The traditional method for testing Facebook Ads is to create individual Ads and let them fight it out amongst themselves to identify the best performer.
And whilst this method does work, there is a much better way that takes full advantage of Facebook’s algorithm and machine-learning capabilities.
It’s called Dynamic Creative, which I abbreviate to DCT (Dynamic Creative Test).
In short, Dynamic Creative allows you to throw a bunch of Images, Headlines, Primary Text, etc, at Facebook, in one single Ad and let it identify the winning assets.
Though I like to be a bit more refined than “throw a bunch of stuff at Facebook!”.
So, I use something known as the 3:2:2 Method, which means I use:
- 3 x Images
- 2 x Headlines
- 2 x Primary Text
I also use 1 x Description and 1 x Call-To-Action button.
I add all of these into one single Dynamic Creative Ad and let Facebook tell me which are the winning assets – and the results may surprise you!
It identifies the winning assets by testing each of them and quickly identifying which of them are generating the most engagement and putting more budget behind them.
As we covered earlier, it’s the Image, Headline, and Primary Text that have the biggest impact on your Facebook Ads performance, which is why I test multiple versions of these, and just 1 x Description and 1 x Call-To-Action button.
Using Dynamic Creative is a far more efficient use of your time and budget because you’re not forcing Facebook to spend money on anything that it knows won’t work.
Instead, you’re providing Facebook with what you think will work, but leaving the fate of your ideas in the hands of the algorithm – and personally, I’m much more inclined to trust Facebook’s understanding of its audience over my own understanding of them!
I run 2 x DCTs per week, let Facebook show me the winning combination of Image, Headline, and Primary Text, then move this winning combo into a separate Ad Set that I can scale up.
If you’re not using Dynamic Creative, I highly encourage you to start, because it will change the game for you, as it has for me and the authors I work with.
Chapter 3
Your Facebook Ads Blueprint
Simplicity is a rule I live by, even in my Facebook Ads, because simplicity scale, complexity fails.
With this in mind, here’s what my Facebook Ads account structure looks like:
- 1 x Campaign (per country, per book)
- 2-3 x (active) Ad Sets (within each Campaign):
- 1 x main scaling Ad Set (that contains all my winning Ads)
- 1-2 x Active DCTs (for creative testing) at any one time
That is it! Nothing is more complicated than it needs to be. Here’s how my Facebook Ads dashboard looks:

I simply have:
- 1 x Campaign for the USA
- 1 x Campaign for the UK
Both of these Campaigns are advertising the same book (Book 1 of my wife’s series) but to people in different countries, which, in our case is the USA and UK.
If we were to start running Facebook Ads in Canada for Book 1 of this series, I would launch a new Campaign that follows the same structure as the USA and UK Campaigns, for a total of three Campaigns.
A very simple blueprint that helps you scale and reduces volatility in your results.
Optimizing Your Facebook Ads In 60-90 Minutes Per Week
Whenever I launch a new Facebook Ad, I always let it run for at least 7 days.
The reason being, that it takes time for the Facebook algorithm to find your audience and identify who, within that audience is resonating with your Ads, and who isn’t.
It then goes out and finds more people similar to those who resonated with your Ads and continues to do so for as long as that Ad is active.
If you’re tweaking your Ads every day, or even every other day (as I used to do myself), you’re going to be preventing the algorithm from discovering your audience and operating at peak performance.
The result of this is that your overall Facebook Ads performance will suffer, and your results will be far from ideal.
All that to say, I recommend blocking out a set time in your calendar each week, ideally on the same day, to do all your Facebook Ads optimization.
With that being said, what is optimization?
In short, optimization is simply doing less of what isn’t working and more of what is working.
In practical terms, this is a case of turning off Ads and/or Ad Sets that aren’t working, and identifying winning Ads and Ad Sets that can be scaled up. That’s what it all boils down to.
As a result of optimization, you will be spending less budget on things that aren’t working and ensuring that most of your budget is spent on Ads that are proven to work, whilst retaining some budget for testing new Ad creative ideas.
And as we know, Ad creative is the cornerstone of successful Facebook Ads.
I have my Facebook Ads optimization sessions on a Monday, and here’s what I do during these sessions:
- Analyze the data from the previous week
- Track the data to calculate the conversion rate and cost-per-sale of each Facebook Ad
- Turn off poor-performing Ads (that have a low conversion rate and/or high cost-per-sale)
- Identify winning Ads from my DCTs and moving them into a new Ad Set for scaling
- Launching new DCTs to test new ideas
Metrics such as Cost-Per-Click (CPC) and Click-Through Rate (CTR), which are recorded in the Facebook Ads dashboard, tell the story of an Ad or Ad Set. They don’t carry much weight as determining factors of whether I see an Ad as a “success” or not.
What really matters to me is the conversion rate of an Ad, and how much that Ad is costing me for every sale or borrow it generates.
I have had countless scenarios where an Ad has a low CPC (Cost-Per-Click), and a high CTR (Click-Through-Rate), and yet, has generated zero sales or borrows. An Ad like this is essentially worthless – aside from the data it has collected that’s telling you it’s not a good Ad.
Outside of my weekly optimization sessions, which generally take me 60-90 minutes, I also have daily check-ins, which take 3-5 minutes, where I’m purely checking the high-level metrics of the Campaigns, Ad Set, and Ads.
I never do any optimization in these daily check-ins; I’m just keeping an eye on overall performance and monitoring for any red flags that need my attention there and then.
Tracking Your Performance
I’ve mentioned conversion rate a few times now, and if you’re not entirely sure what this means, in short, it’s how many clicks (on your Facebook Ads, in our case, but can be clicks from anywhere) turn into sales or borrows of your books.
For example, if you had a Facebook Ad that received 100 clicks and generated 5 sales, that would be a 5% conversion rate; the calculation looks like this:
(5/100) x 100
Believe it or not, a 5% conversion rate is actually pretty good! Not amazing, but good and very acceptable for Facebook Ads.
To calculate the conversion rate, you need to know how many sales and page reads (if your books are in Kindle Unlimited) each Facebook Ad is generating.
To do this, we need to use a free tool provided by Amazon called Amazon Attribution. This tool will allow you to generate unique links for each Facebook Ad that will allow Amazon Attribution to track the performance of each Ad for you.
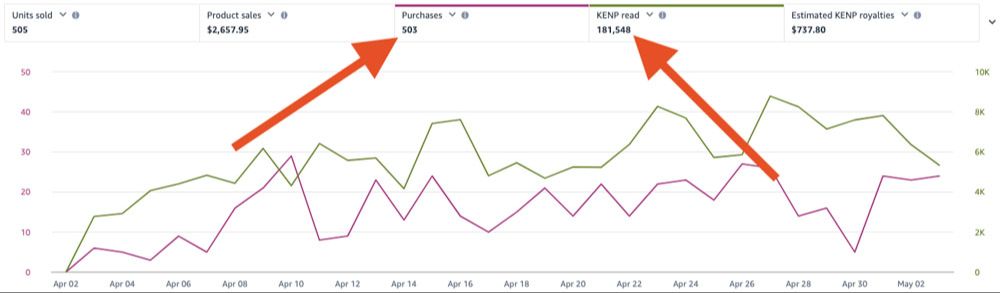
The screenshot above shows a 30-day snapshot of my Amazon Attribution dashboard for our USA Facebook Ads, which generated 503 sales and 181,000 page reads (these numbers are excluding all organic sales and borrows, as well as sales and borrows from our Amazon Ads).
Rather than give you a full blow-by-blow account of Amazon Attribution in this article, I’ve recorded a video that walks you through everything you need to know about it, how to set it all up, and add the links to your Facebook Ads.
You can watch that video here:
Watch the Amazon Attribution Walkthrough Video
Amazon Attribution is an absolute must for authors running Facebook Ads; without knowing how every individual Facebook is performing from a conversion rate and cost-per-sale standpoint, you are flying by the seat of your pants! In other words, you’re winging it!
Optimization then isn’t something to be afraid of; it’s actually very simple when you break it down; turning Ads and Ad Sets off! That’s what it boils down to.
There are of course a few nuances that we’ve discussed, but ultimately, it’s nothing to be intimidated by, and will in fact drastically improve the overall performance of your Facebook Ads and save a lot of money in the process by not spending money on Ads that aren’t converting.
Tracking The Numbers
Keeping a record of how each of your Facebook Ads performs is a critical process to go through each week; this will help you to get a real understanding of the type of Facebook Ads that work, and those that don’t.
You could build your own spreadsheet to track all of this…
Or, you could download the FREE Facebook Ads Tracking Tool I’ve built myself and use every single week to track my own Facebook Ads.
When you join my weekly newsletter (The Saturday Self-Published Author, where I share one Facebook Ads tip, strategy, or tactic every single week)), I’ll also send you my Facebook Ads For Authors Masterclass.
The Masterclass is a FREE 3-part video series where I go deeper into my Facebook Ads Strategy and also includes access to my Facebook Ads Tracking Tool.You can find out more and sign up for free here: https://www.matthewjholmes.com/
Chapter 4
Scaling Facebook Ads
Scaling, just like optimization, is nothing to shy away from. All we’re doing is increasing our daily budget. That’s it.
The nuances here are very simple:
If our ROAS (Return on Ad Spend) for the previous 7 days has been good and meets our target, we increase our daily budget by 10% – 20%.
If our ROAS for the previous 7 days hasn’t been good and doesn’t meet our target, we lower our daily budget by 10% – 20%.
ROAS (Return on Ad Spend) is simply calculated by taking your total royalties and dividing it by the total Ad Spend for the same period.
And because each country/marketplace is different, I like to break things down on a country-by-country basis.
For example, I’ll calculate the ROAS for the USA and adjust the budget just for my USA Facebook Ads Campaign.
I’ll then calculate my ROAS for the UK and adjust the budget for my UK Facebook Ads Campaign.
And because we are using Advantage Campaign Budget, once we’ve calculated our ROAS, we can adjust our budget in about 6 seconds flat!
Just click the little pencil icon in the budget column of your Facebook Ads dashboard (at the Campaign level), as shown below.
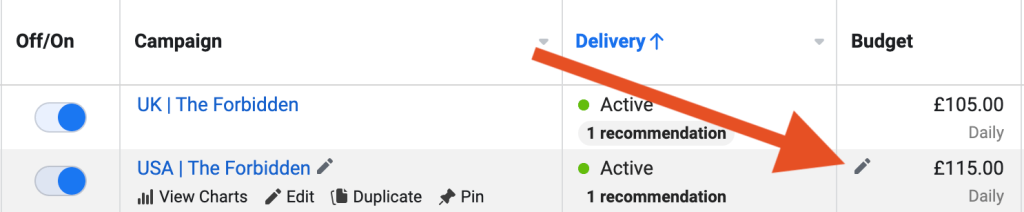
Then enter your new daily budget into the text box and click Publish.

Increasing your daily budget will allow you to spend more, yes, but also to reach more people with proven Ads that convert into sales and/or borrows.
And this is why optimization and scaling go hand-in-hand.
You shouldn’t be scaling your Facebook Ads without first optimizing and knowing you’re spending money on Ads that convert.
For this reason, I scale my Facebook Ads in the same session I do all my optimization on (which for me, is on a Monday).
That way, all the changes I’m making to my Facebook Ads are done on the same day and can run un-deterred for the next 7 days, before I come in again and make more tweaks to the Ads based on their performance over the previous 7 days.
A word of warning about scaling your Facebook Ads…
It can be tempting when things are going well to really ramp up the spend on your Campaigns.
Don’t do it!
You’ll run the risk of losing all the momentum and traction you’ve built up, and this could have a serious negative impact on your performance, because you’re giving Facebook too much money to play with, too soon.
And because Facebook will spend whatever money you give them, they will find unsuitable people to show your Ads to just so that they can spend your money.
You’re much better off gradually increasing your budget by 10% – 20% each week.
With the unrestricted targeting strategy we’re using, we need to steadily provide Facebook with more budget to play with, as and when it proves to us that it’s finding our ideal readership, and a good percentage of those readers are converting into sales and page reads.
And in a nutshell, that is how you scale Facebook Ads to reach more of the right readers and ultimately, to sell more books.
Chapter 5
Next Steps
You now have what it takes to launch your first (or next) Facebook Ads Campaign!
And that really is your next step… to take action.
Learning from articles such as this, courses, videos, etc, is incredibly valuable, don’t get me wrong. But when it comes to actually getting results from your Facebook Ads, you need real-world experience. You need to implement what you learn.
You need to fall over a few times, get back up, and try again; just as we did when we were learning to walk as kids.
I hope that, by now, you can see the potential Facebook Ads has to offer, and that you’re excited to get started.
The strategy I’ve shared with you in this article isn’t (yet) best practice in the author community, so you may feel some resistance coming up in your mind as you start to put all this into practice.
Just remember that you’re building a long-term career as an author here, and unrestricted targeting is the way to go if you want to achieve stability, scalability, and affordability with your Facebook Ads.
You may get pushback from other authors saying that Detailed Targeting is the way to go, but from the $10,000’s I’ve already spent on Unrestricted Targeting at the time of writing, I can categorically say that this strategy is far more effective and lucrative than any Detailed Targeting.
And remember, you don’t need a huge budget to start seeing results. You can start small and scale up as fast or as slow as you like. Personally, as I mentioned earlier, I recommend starting at $20 per day with this strategy; $10 per day at an absolute minimum, but ideally $20 if you can.
If you’re brand new to Facebook Ads and the thought of spending money on advertising seems intimidating or outside of your comfort zone, that’s okay.
Just know that, if you want to put yourself out there, and position your books in front of thousands, millions of people around the world, Facebook Ads can do that for you.
You need to work on your mindset, as I have done myself, to see that Facebook Ads is an investment, not an expense.
I speak from first-hand experience that Facebook Ads can truly transform your author career; it just takes time, patience, and persistence, so stick with it.
Take that first step…
Thank you so much for reading.
I wish you all the very best with your Facebook Ads.


