Scrivener is one of those tools that can either make you feel incredibly organized or make you wonder why your “quick writing setup” now has seventeen folders, six corkboards, and a character sheet for someone who appears in one scene.
I’ve used Scrivener enough over the years to understand the appeal, even if it’s not the tool I personally use these days. It’s very good at giving big, messy writing projects a place to live. Chapters, scenes, research, notes, outlines, character details, front matter, all of it can sit inside the same project without turning into a folder full of files named “final draft,” “final final draft,” and “no really this one.”
Templates make that part even easier. Instead of opening a blank Scrivener project and building the whole structure yourself, a template gives you a starting framework. That might mean chapter folders, scene placeholders, plotting sections, character sheets, research areas, or a structure based on something like Save the Cat, the Snowflake Method, or a specific genre.
That doesn’t mean every template is going to fit the way you write, though.
Some writers want a lot of structure before they start drafting. Others need just enough organization to keep the project from turning into soup. So I wouldn’t treat any Scrivener template as the “right” way to write a book. Think of it more like a pre-built workspace you can adjust, ignore, or completely rebuild once you figure out what helps and what gets in your way.
Below, you’ll find free Scrivener templates for fiction, nonfiction, blogging, case studies, white papers, story structure, worldbuilding, and more. I’ll also show you how to import a template, make your own, edit one you already have, and delete the ones you no longer need.
List of Free Fiction Templates for Scrivener
If you’re writing novels, short stories, novellas, anthologies, or other forms of fiction, these templates are for writers like you. Some of them will help you set up your novel and plan it out, while others are great for stylizing your text and headings.
Use the table below to explore the fiction template options. You’ll find everything from basic novels to story plotting and script writing templates.
| Name of Template | Type of Writing | Check It Out |
|---|---|---|
| Story Structure Template | Plotting and Outlining | |
| Vertigo | Comics | |
| Save the Cat Template | Short Stories | |
| Snowflake Method | Novel Writing | |
| World-building Leviathan | Novel Writing | |
| No Nonsense Novel Template | Novel Writing | |
| Story Grid Template | Novel Writing | |
| Murder Mystery Template | Mystery Novels | |
| Romance Template | Romance Novels |
List of Free Nonfiction Templates for Scrivener
Nonfiction writers, these templates will help you organize your information into a book, blog, or paper that flows seamlessly from one section to the next. Whether you write essays, case studies, or memoirs, these templates will save you time and energy so you can focus on what you do best: write!
Use the table below to explore nonfiction templates. You’ll find a wide variety of options to help you with your next project.
| Name of Template | Type of Writing | Check It Out |
|---|---|---|
| Case Study Template | Case Studies | |
| Blogging (Single Blog) | Blogging | |
| Multi-blog Template | Blogging | |
| White Paper Template | White Papers | |
| Case Study Template | Case Studies | |
| Ultimate Nonfiction Book Templates (multiple) | Nonfiction Books (memoirs, self-help, etc.) |
One thing to keep in mind as you’re using Scrivener templates is that they’re mainly designed to help you organize and write your manuscript.
When the book is finished, most authors still export the file and move it into a formatting program to prepare it for publishing. That’s where tools like Atticus can make the final step much easier, since they’re built specifically for turning manuscripts into finished books.
How to Install a Template in Scrivener
Now that you know what a Scrivener template is and where to find them, you need to know how to install them in the software.
This section will show you how to use both Scrivener’s default templates and import third-party templates for use in your project. If you haven’t already, visit some of the websites listed above and download a template or two.
Now that you’ve done that, let’s get started.
How to Use Scrivener’s Default Templates
If you’ve used Scrivener before, you should be familiar with their default templates. They are already installed and ready to go. You can find templates for projects like novels, short stories, radio scripts, cookbooks, and essays right inside the software. These templates are fantastic for beginners and anyone who wants to keep things simple.
Here’s how to find and use Scrivener’s built-in default templates:
- Open Scrivener and select “File,” then “New Project.”
- In the pop-up window, you’ll see a selection of templates. Choose the type of project you want to create and select the template that best describes your work.

- Click “Create.”
- In your new project, click “Project” and “Meta-Data Settings.” If everything looks good, you’re all set.
- If you aren’t sure what you should be looking for in this step, don’t worry. You can use these settings to add new label colors, statuses, and things like the title and author’s name.

How to Import a Third-Party Template
If you need something more specific than what you can find in Scrivener’s default templates, you can download and import one from an external source. There are hundreds of templates out there, and chances are, several of them will be suitable for your project.
You might want to download a third-party template if you’re working on genre fiction, want help plotting your novel, or are writing a series of blog posts or essays. No matter your project, you can find a Scrivener template to organize your information and write your best book ever.
It’s important to note that while many third-party Scrivener templates are free, some charge a fee or require you to sign up for an email list before you download them.
Here’s how to import a third-party template into Scrivener:
- If you haven’t already, visit one of the websites listed in the tables above and select a template you’d like to try.
- Download the template.
- If your template comes in a zipped folder, follow steps 3 & 4. Otherwise, proceed to step 5.
- If necessary, unzip the downloaded folder by right-clicking the folder and selecting “Extract All.”
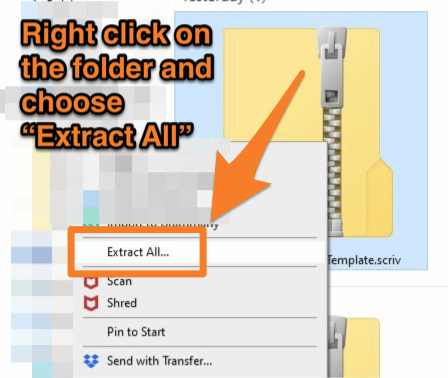
- Follow the directions to save the unzipped folder on your computer.
- Open Scrivener and select “File,” then “New Project.”
- In the lower left-hand corner of the pop-up window, click “Options” and “Import Templates.”

- Locate the .scrivtemplate file and click “Open.”
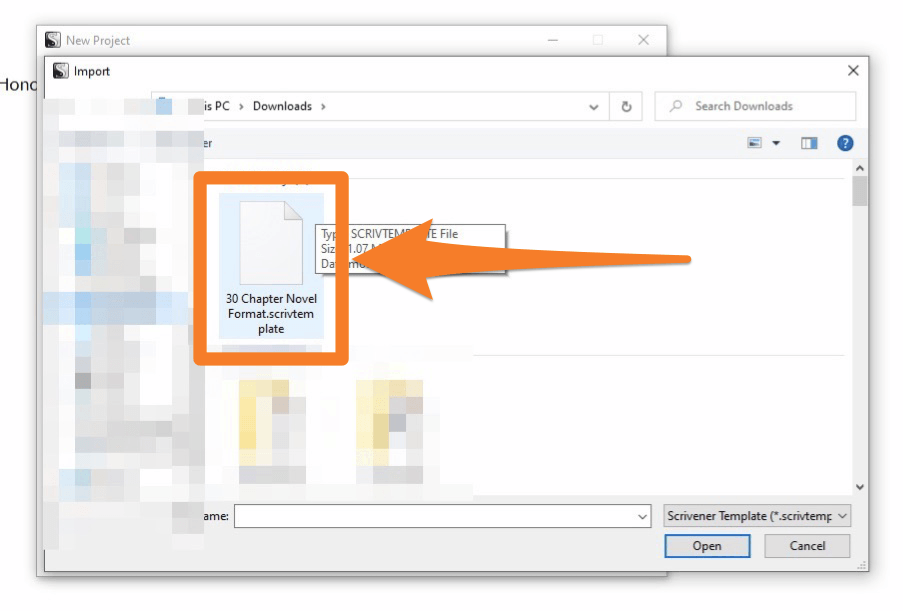
- The template will now appear in the default options in Scrivener. Select it and click “Create.”

For this example, I imported a template called “30 Chapter Novel Format.” As you can see in the image below, the template already has the various plot points you’d typically find in a novel. There is also a spot to develop your characters, collect research, and organize your book’s front and back matter.

Having this file already set up will save you quite a bit of time. Now you’re ready to start on the next task—the complicated process of planning and writing your novel!
How to Make Your Own Scrivener Template
Now you know how useful Scrivener templates are and how to install them. But if you can’t find a template that meets your needs, you can create your own. You might also want to make one if you have several projects that all use a similar layout (like a book series).
In this section, I will show you how to set up a Scrivener file and save it as a template. Doing this will allow you to keep your setup and presets consistent across several projects.
You don’t need any special skills to make a Scrivener template. If you know how to use the software, then you can make a template. The process is straightforward, but here are a few things you should remember before you create a template:
- Start with a blank Scrivener project file.
- As you build your template, leave the content blank. (For example, create and label new text blocks and folders, but don’t include anything in them.)
- Check the Meta-Data (click “Project,” then “Meta-Data Settings”) to make sure it looks right. Make any necessary adjustments.
With those things in mind, here’s how to create your own Scrivener template.
- Open a blank Scrivener project file by clicking “File” and “New Project” then choosing the blank file option.
- You will have an almost empty project file. Use the icons to customize the following items:
- Binder folders
- Documents
- Labels
- Status presets
- Compile presets
- Fonts
- Headings
- Front and back matter
- Corkboards, icons, and color-coding

- Add character sheets, story structure, and references as needed.
- When you’re satisfied with your file, select “File,” then “Save as Template.”
- In the template information box, add the title, category, description, and icon.
- Click “OK.”
Congratulations! Now you have a brand new template, and you can use it as many times as you want for any of your upcoming projects.
How to Make Changes to a Template
We’ve talked about how to find templates and import them to Scrivener. We’ve even discussed how to make your own custom templates. But what if you want to make changes to an existing template or one that you found on the web?
Sometimes you need just a few adjustments to make a template perfect. Maybe you need to change the front matter or change some icons on a template you imported. Whatever modifications you need to make, don’t sweat. It’s a simple and easy process.
Here’s how you do it.
- Open the template in Scrivener.
- Add and delete items as needed.
- Adjust icons, color coding, settings, fonts, and folders.'

- Select “File,” then “Save as Template.”
- Fill out the template information box.
- Click “OK.”
Now you have a fully customized template. You can use it for all of your future projects without having to adjust the settings each time.
How to Delete a Template
At some point, you might find yourself overwhelmed with template options. If you want to remove a template and simplify things, it’s easy to do.
While you can’t delete any of the default templates, you can remove custom ones that you’ve imported, created, modified, or duplicated. Here’s how you do it in just a few steps:
- Click “File,” then “New Project” to open the template window.
- Select the template you want to delete.
- Click “Options,” then “Delete Selected Template.”

Use the Template That Helps You Keep Writing
Scrivener templates are useful because they remove some of the setup work that can slow you down before you ever start writing.
Instead of building folders, labels, notes, research sections, and chapter structures from scratch every time, you can start with something that already has a shape. For a novel, that might mean a template built around story beats, scenes, characters, and worldbuilding. For nonfiction, it might mean a structure for chapters, research, examples, case studies, or blog posts.
But the template is only helpful if it makes the project easier to work on. If you open one and immediately feel like you’ve been assigned homework by a very organized stranger, change it. Delete sections you don’t need. Add the ones you always end up creating anyway. Move things around until the setup fits the way your brain actually handles a book.
That’s one of the better parts of Scrivener. You’re not stuck with the structure you downloaded.
And once you’ve built or modified a setup that works for you, saving it as your own template can make the next project a lot easier to start. Not because the template writes the book for you, unfortunately, but because it gives you a familiar place to begin.