
Over the past 10 years, I've formatted many books using Microsoft Word.
My reason for doing so back then was because I already had Word on my computer and I'd spent enough time learning it over the years that I finally figured out all the weird nuances and tricks to make a print book and ebook file that would be accepted by book markets like Amazon. However, it wasn't without its trials and tribulations. There is a LOT of things I wish I'd known before I got started.
So, to help you with formatting your book using Word, I wrote the below steps. They have helped me out over the years and ensured my book was up to industry standards. If you follow them, you should have no problem crafting a good looking book and uploading it to the world's largest book markets.
Also, to help along with these steps, I created free Word templates. Just go there, follow the steps, select your preferred trim, and it will send you a template to use. This should save you a lot of time and energy.
Note: Although I give you the steps to formatting with Word below, I do highly recommend that you look into using a specialized book formatting software instead. First off, Word now costs money to keep. Second, with book formatting software like Atticus being so easy to use (and being inexpensive), it's a much better option. Also, you will find that you can design amazing looking books and can do more using a software like Atticus instead of Word.
Step 1: Download a Free Word Template for Formatting
Although this step isn't required, I highly recommend you take it. My free word templates for formatting will save you from making a lot of tedious steps and were made with features and capabilities that took me years to figure out.
Granted, you still could get better results using a book formatting software, since using Word will be limited in what you can do. However, these templates will open up even more functionality, customization and more than if you work with your own document.
So, think first about checking out these templates and then copy and paste our work into it.
Access Free Word Templates for Formatting…
To help with formatting with word, I built a free Word template that has most of what I'm going to teach you here baked into it. This should really help with a lot of the headache. So, check it out.
Step 2: Get Everything Ready
Before you start messing with margins, spacing, and all the rest, take a second and make sure your document is actually ready.
What I mean is this: have your title page in place. Your introduction. Your preface. Anything that belongs in the front matter or back matter of the book. A lot of writers get so excited that the manuscript is finally done and edited that they jump straight to formatting the main body and forget the smaller pieces. But those smaller pieces matter more than people think.
If you’re not totally sure what should go in the front and back matter of a book, check out this article.
Font
When I format in Word, I like to start simple.
Use a standard font and size, something like 12-point Times New Roman. If you’re getting a manuscript ready for agents or editors, that’s still the standard people expect. And even if you’re formatting for self-publishing, starting with something clean and familiar just makes the whole process easier.
It also helps you avoid creating a mess for yourself later.
Once your book is organized and the font is set, then you can move on to the actual formatting.
Setting Paragraphs and Spacing
This is one of those areas where a book can quietly start looking amateur if you’re not careful.
Paragraph indents and spacing make a big difference. If they’re off, the book feels off. So it’s worth taking a minute to set them correctly from the beginning. Make sure you’re in the Home tab first.
Then click on the Paragraph bar at the top of your screen.
Under Special, set the First Line indent to 0.3″. That gives your paragraphs a professional look without making the indent too wide.
For line spacing, set it to:
Line spacing → Exactly → 15 pt
I like this because it gives the text some breathing room without making it look like a school paper. It also helps prevent weird spacing issues from popping up later.
Then set Spacing Before and After to 0 pt so Word doesn’t add extra space between paragraphs.
That one little setting saves a lot of frustration.
Chapter Headings
You’ll also want to set up your chapter headings the right way.
This is important because when your Word file gets converted into an ebook, the formatting helps the ereader understand where each new chapter begins. If you skip this step or do it inconsistently, it can cause problems later.
So here’s what to do.
Click on one of your chapter titles. Then go to the Styles tab. You should see a window open on the right side of the screen.
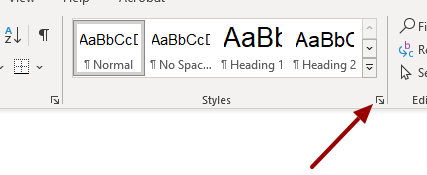
Choose Heading 1.
Once you do that, the heading will change. After that, you can still customize the font however you want without removing the Heading 1 style itself. That part is important.

Now go through the rest of your book and do the same thing for every chapter heading. Just make sure they all match.
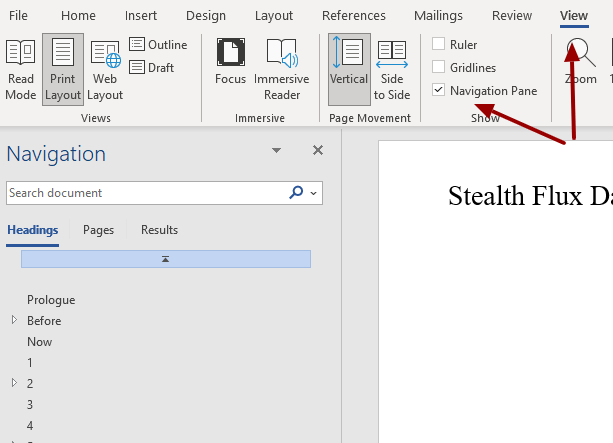
When you’re done, go to the View tab and check the box for the Navigation Pane. That will open a panel on the left side of your screen where you can see all your chapter headings listed out. It also makes it really easy to jump from chapter to chapter.
And as a bonus, setting your chapter headings up now will make your Table of Contents much easier to create. It also helps later if you ever decide to import your manuscript into Atticus or another formatting tool.
Table of Contents
Next up is your table of contents.
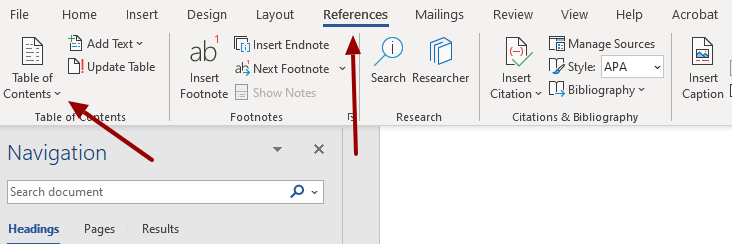
You’ll want this on its own page, usually after the title page and copyright page. Put your cursor where you want the TOC to go, then head to the References tab and click Table of Contents. Choose Automatic Table 1.
After that, go back into Table of Contents and choose Custom Table of Contents near the bottom.
When the box opens, set Show Levels to 1.
Then uncheck the Show Page Numbers box above it.
Word will ask if you want to replace the current TOC. Click OK.
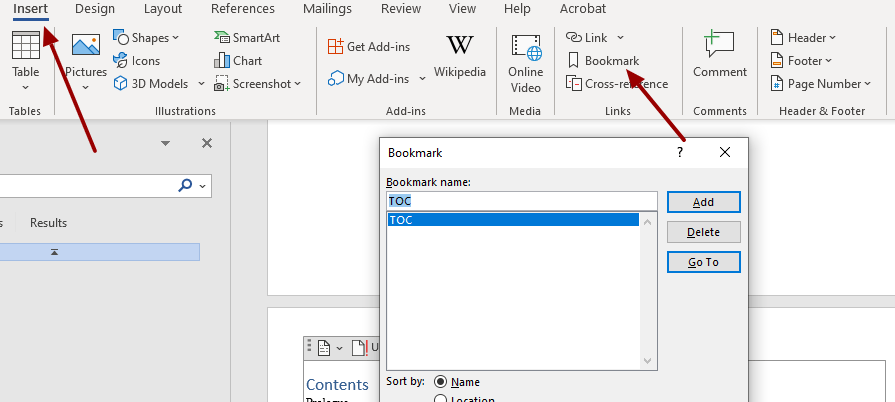
After that, you’ll want to add a bookmark to the table of contents. Highlight the word Contents at the top of the page. Then go to the Insert tab. Under Links, click Bookmark. Name the bookmark TOC.
If your chapters don’t show up correctly in the TOC, the first thing I’d check is whether every chapter title actually has Heading 1 applied to it. That’s usually the issue.
And that’s it.
I won’t pretend this part is fun, but it’s also not nearly as hard as it looks once you do it step by step.
From there, you can upload your .docx file and Amazon will convert it automatically.
Oh, and be sure to double-check your work!
Tip: Amazon supports EPUB uploads now too, but a properly formatted DOCX still works really well if you follow the steps above.
Step 3: Format for Print
Now that you’ve got the ebook side set up, it’s time to make sure the print version actually looks like a real book.
This is where Word can get a little annoying.
One of the downsides of using Word is that things can look fine at first… and then once you really start checking the file, you notice little formatting issues here and there. That’s especially true if you’re doing both ebook and print. So you’ll want to go through everything carefully and pay close attention to how the text and layout actually look.
And yes, if all of this starts sounding like more hassle than you want to deal with, this is one of the reasons I now use Atticus for formatting. But before I get into that, let’s finish the print side of things.
For best results, start with the ebook formatting steps above first. Print formatting is a bit more involved, but it builds on the same foundation. So if you already have your chapter headings, font, paragraph spacing, and table of contents set up, you’re in good shape.
From there, I recommend creating a brand new blank document and pasting your manuscript into that. That way you can keep one file for your ebook and one for your print version. Trust me, it makes life easier.
You can also look for a Word template and paste your manuscript into that instead. There are free and paid options out there made specifically for Word. Just know that even with templates, there’s usually still some trial and error involved.
Book Size and Page Setup
Before you do anything else, you need to decide what size your book will be.
There are a few common paperback sizes, but in the U.S. the most popular ones are 5″ x 8″, 5.5″ x 8.5″, and 6″ x 9″. For the example here, I’m using 5.5″ x 8.5″, since that’s a very common fiction trim size.
If you’re not sure what size to use, the easiest thing to do is grab a book off your shelf that feels about right and measure it. There’s a good chance it matches one of those standard sizes.
And if you want something less common, check with your print-on-demand company first to make sure they actually support that size.
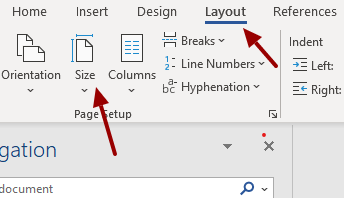
Once you know the trim size, go into your blank document, click the Layout tab, then choose Size. From there, click More Paper Sizes at the bottom and enter the size you want. For this example, I used 5.5″ x 8.5″.

Margins
Next, go to the Margins option on the Layout toolbar and choose Custom Margins from the bottom of the dropdown.
This part matters more than people think.

If your margins are too small, the book can look cramped… or worse, some of the text can get swallowed up in the binding. And for print books, the inside and outside margins are not the same. The inside margin needs a little extra room so the text doesn’t disappear into the gutter.
For small to medium paperbacks, KDP often recommends something around this range:
Inside: about 0.375″
Outside: about 0.25″ to 0.35″
In Word, set the document to Mirror Margins, then adjust from there based on your page count and how it looks in Print Preview.
Copy and Paste Your Book
Once your document is set up, this is a good time to paste in your manuscript.
The reason I like doing it at this point is because it gives you a clear print file to work with, separate from the ebook one. It also makes the next few steps a lot easier, since you can actually see where your chapters and front matter begin.
Header
After your manuscript is pasted in, go to the Insert toolbar and click Header.
You’ll get a dropdown with different header styles you can use. Pick the one you like best.

If you’re not sure what to choose, just open a few books you already own and see what they do. Most print books use the header for the author name, the book title, or sometimes both. Usually the header text is smaller than the main body text, or at least styled differently enough that it doesn’t blend in.
Footer
Next, let’s set up the footer with page numbers.
But here’s the part that trips people up…
You usually don’t want page numbers showing on the title page, copyright page, or table of contents. You want them to start when the actual book starts. So you need to break the front matter and the main text into separate sections.
Here’s how to do that.
First, exit the Header and Footer area so you’re back in the normal document view. Then place your cursor at the bottom of the last page before the main body of your book begins.
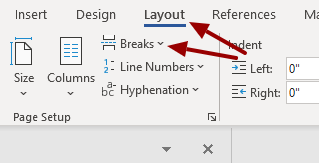
Go to the Layout toolbar, click Breaks, then under Section Breaks choose Next Page. Make sure it’s the section break, not just a regular page break.
That creates one section for your front matter and another for the main text. And that’s what lets you control page numbers the way you want.
After that, go to the bottom of the first page where you want numbering to start and double click in the bottom margin. That opens the footer area.
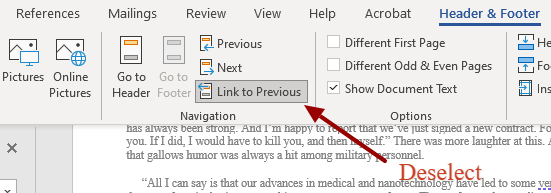
You should now see the Header and Footer tab appear at the top. Find the Link to Previous button. It’ll probably be highlighted. Turn that off.
Then click Page Number and choose whichever number style you want. Once you do that, the numbers should start on that page instead of carrying over to the front matter.

One more important thing here…
Turn off Widow/Orphan control. Go to:
Home → Paragraph → Line and Page Breaks → uncheck Widow/Orphan control
If you leave it on, Word will sometimes force weird spacing to avoid leaving a single line at the top or bottom of a page. In theory that sounds helpful. In practice, it can make your pages look awkward.
After that, just manually clean things up if needed. Sometimes a tiny adjustment to spacing is enough to fix one weird line without messing up the rest of the page.
Once you’ve done that, you’ll have a print-formatted manuscript.
Remove First-Paragraph Indents
At the beginning of each chapter, and usually after scene breaks too, you’ll want to remove the first-line indent from the first paragraph.
That small detail makes a book look much more professionally typeset.
To do that, click in the first paragraph of the chapter and hit Backspace once, or apply a no-indent style if you’re using one.
It’s subtle, but readers notice the overall effect even if they don’t realize why the page feels cleaner.
End With an Even Page Count
Before you export, check your total page count.
Print books need to end on an even number of pages. That’s just how printing works.
So if your book ends on an odd page, add a blank one. Usually that goes before something like your About the Author page if needed.
Export to PDF
Once everything looks right, export the file as a PDF for print.
That’s the format KDP expects.
Go to:
File → Save As → PDF
Then upload it into KDP and preview it there to make sure nothing shifted around during export.
Triple Check Your Work!
Once your file is uploaded, go through Amazon’s print previewer and check everything carefully.
Look at the margins. Look at the page numbers. Look at the chapter starts. Make sure nothing got cut off and nothing looks out of place.
If you’re only making one simple book, Word may be enough for what you need. And if you follow the steps above, you can absolutely make it work.
But if you want something that looks more polished, or you plan to format more than one book and don’t want to keep wrestling with Word every single time, that’s where Atticus starts to make a whole lot more sense.
A Better Option: Formatting With Atticus
Like I discussed above, I personally use Atticus now, instead of Word. It's a brand new all-in-one formatting and writing software. It allows you to customize your book layout with several different options, all with a few clicks of the mouse.
What I love best over other book formatting software is that in Atticus, you can not only format beautiful looking books in minutes, but that you can also choose to write your book in Atticus. It has many of the features you'd want for writing a book and the idea of writing and formatting in the same tool is amazing.
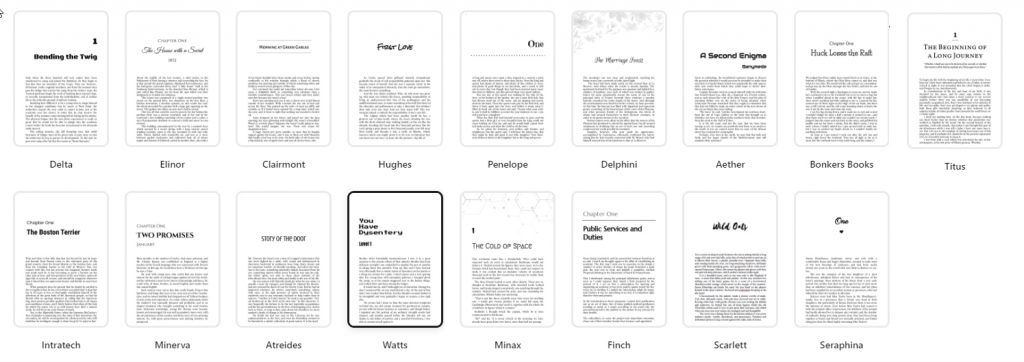
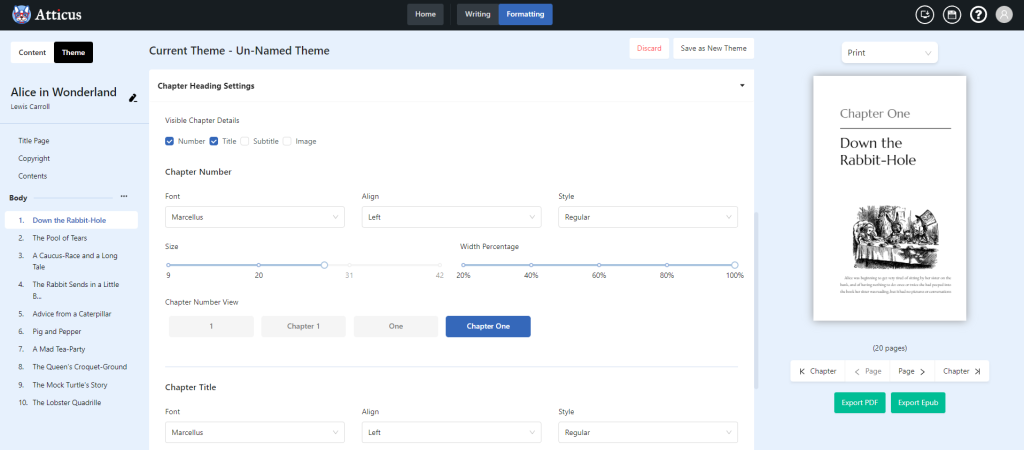
But focusing just on formatting, Atticus allows you to either build custom themes for your books or choose from one of many different pre-developed themes. This way, you can quickly choose which style you way for your book and with a click of a button, its set. Even within those options, you can customize titles, subtitles, and even how the numbers show up. Whether you're writing a nonfiction book or a fiction book, there's a template for you in Atticus.
You can also customize the paragraph styles, making them indented or spaced. You can also add custom paragraph breaks or choose from existing ones. There's an option for lead-in small caps and, of course, the always classy drop cap option. And, you can preview the changes in real-time.
And finally, just take a look at what you can create with Atticus. It is feature rich to the point you can craft something absolutely amazing with ease.
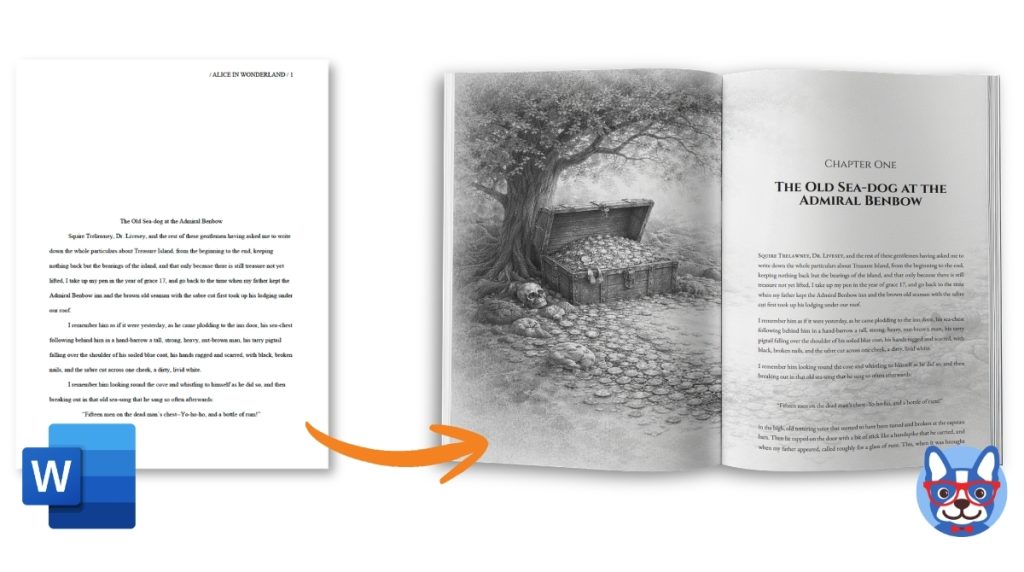
Notice the difference between a Word formatted book, and what Atticus can do. I personally love how my books stand out and look to my readers, and I recommend you think about doing the same.
So if you want to save time (and time is money, especially for indie authors, isn’t it?), then head on over to Atticus.io and get yourself a copy for a one-time price. No monthly fees here. And you’ll always get the latest updates as we continually upgrade and make Atticus even better.
Video: Putting it All Together (See Video)
For a nice summary of this article, be sure to check out our video on how to format a book in Microsoft Word.

Want more videos like this? Be sure to subscribe to my YouTube channel!


