
Ready to write your first book, but not sure how to approach it as a beginner?
Or maybe you’re tired of searching the web for help, only to find overly complicated “ultimate” guides that try to teach you everything at once?
In this article, I’m going to walk you through a simple, beginner-friendly 4-step roadmap to writing a book, with a focus on choosing the right direction before you commit serious time and energy.
No filler. No fluff. And no advanced details you don’t need yet.
If you’re brand new to writing a book, this guide is designed to help you get oriented before you dive into the writing itself.
We’ll start with the first step (the one you can’t afford to skip).
Step 1: The thing you must do before writing a single word
This step helps beginners avoid writing a book no one wants by validating demand before they start.
Picture this:
You pour your heart and soul into writing a book. You work long hours. Miss time with your loved ones. You critique every page, every paragraph, every syllable until they’re perfect.
You’re certain your hard work will pay off and people will sing your book’s praises.
But after publishing, all you hear is the sound of crickets chirping.
No one buys your book…
No one leaves book reviews singing its praises…
Heck, no one outside your friends and family even knows it exists.
This is the reality that haunts thousands of authors who’ve come before you.
And the reason (at least for many)?
They never validated their book idea.
Their books, their precious words, were banished into obscurity because they:
- Never confirmed there was a waiting audience
- Never confirmed the audience spends money
- Never confirmed whether the competition was too stiff
But you?
You’re going to avoid their mistakes. Here’s how:
Validate your book idea: the free (but imperfect) way
Once you have a big idea in mind (which is often the hardest part for beginners), it’s time to validate it.
Let’s start with the quick-n-dirty method:
- Type your idea into Amazon. Go to Amazon and do a Kindle Store search for keywords or phrases that describe your book idea.
- Scroll to the 5th book. A whopping 63% of Kindle clicks go to books in the top five positions, so if you want your book to be seen it needs to be on Amazon’s first page (and ideally in its top 5).
- Find the book’s BSR. Open the book’s listing and scroll down to the “Product details” section. Find the “Best Sellers Rank” number.
- Calculate the number of books sold. Put the BSR number you grabbed into our free Amazon Book Sales Calculator. This will tell you how many books are sold per day. Multiply this number by the sales price of the book.
- Analyze the results. You now have a rough estimate of how much money your book would make if it reached the 5th position on Amazon’s first page and you sold it for the same price as the competitor’s book.
Is it a perfect system?
No, which is why most authors who take their writing seriously opt for a different approach…
The better way to validate your book idea: Use Publisher Rocket
The above method can tell you if there's a reader or two (or thousand) willing to buy books like yours, but it can’t tell you:
- How often people search Amazon for books similar to yours
- Keywords or book ideas similar to yours
- Average sale price of books similar to yours
- The difficulty (or ease) of the competition
That last one is huge…
Earlier, I mentioned that the majority of Kindle clicks (and, by extension, purchases) go to the books in the first 5 positions.
Here’s a chart that breaks it down:
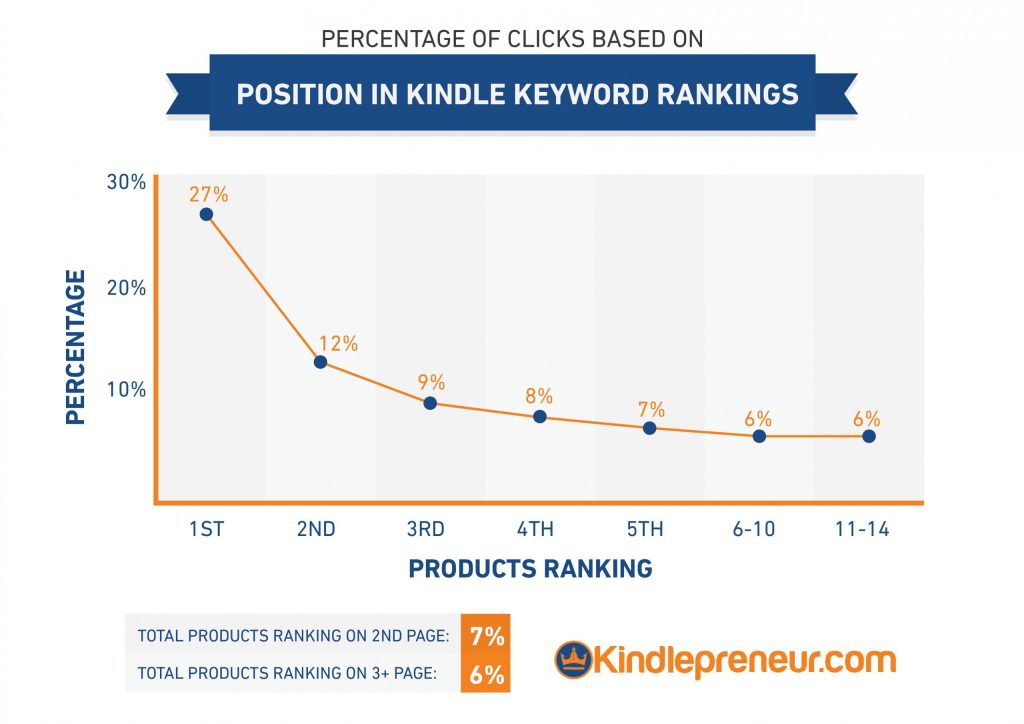
See what I mean?
Your book’s success depends on its ability to land a top spot in Amazon’s search results. And when you’re an unknown or aspiring writer, your best bet for success is targeting keywords and ideas that aren’t competitive.
This is where Publisher Rocket comes in handy.
Here’s how it works:
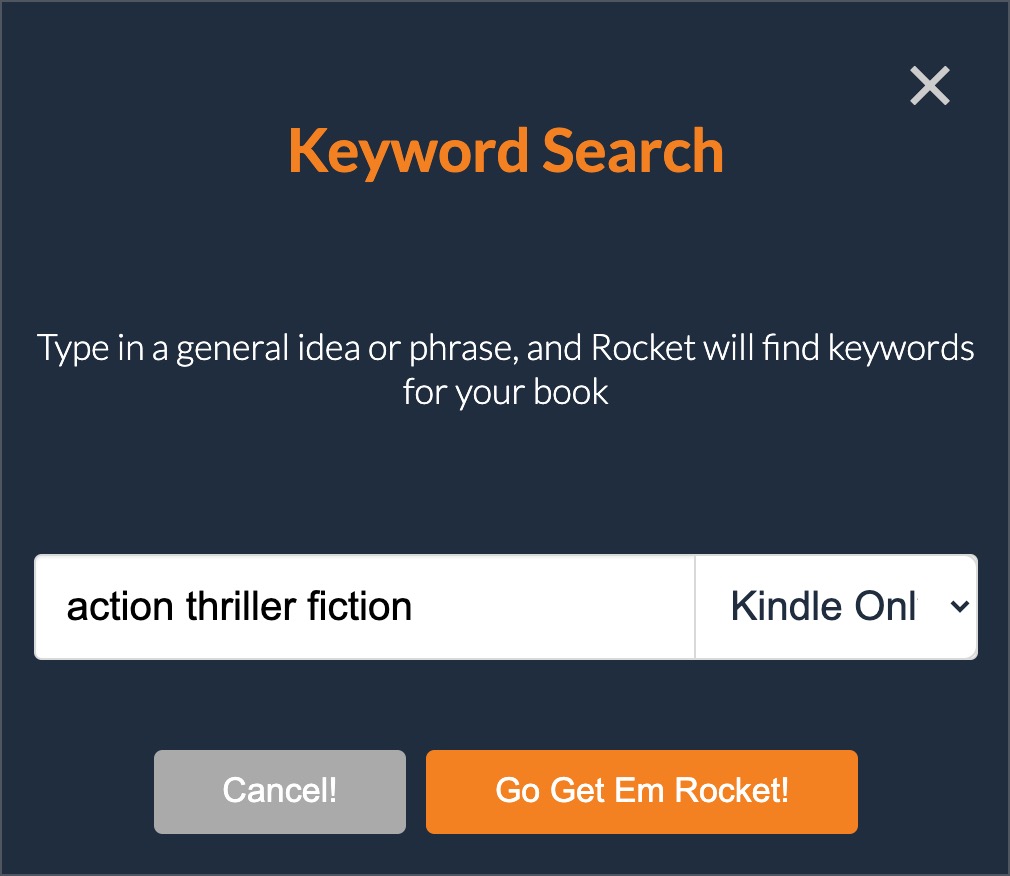
#1: Run a keyword search for your book idea
Start a keyword search inside Publisher Rocket…
Enter your book idea…
Select whether you want to bring back “Books”, “Kindle Only”, or “Audible Only” results.
Click “Go” and you’re off to the races.
#2: Analyze the results
And… you’re done.
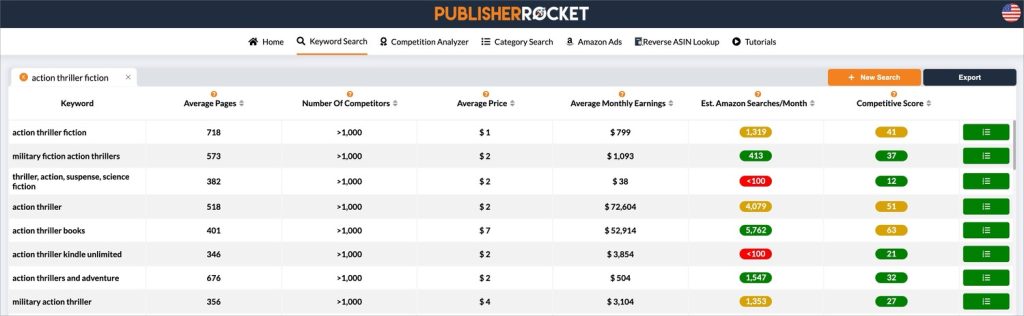
Publisher Rocket will bring back every piece of data needed to know if your book idea is a viable one. This includes:
- Keyword: A list of similar phrases that shoppers type into Amazon (so you can get more ideas)
- Average Price: The average list price for the top ranking books for this keyword (so you can know what price point to use)
- Average Monthly Earnings: The estimated average monthly earnings for the top books ranking for the keyword (so you don’t have to do any math)
- Estimated Amazon Searches/Month: The estimated number of people who typed that search phrase into Amazon each month (so you can know how popular it is)
- Competitive Score: How difficult it will be to rank in the top 5 positions for the keyword (so you can know whether to bother)
As a general rule, we recommend that new writers target keywords with a “Competitive Score” of 40 or below.
Knowing this, you can zero in on non-competitive keywords with the best combination of monthly earnings and monthly searches:

The keywords “military fiction action thrillers” and “military action thriller” show promise.
Each have:
- Average monthly earnings of over $1,000
- A decent number of monthly searches
- Low competition scores
Both seem like good options, but Publisher Rocket has more information if you want to keep digging.
Click the green button for the keyword you want to analyze:
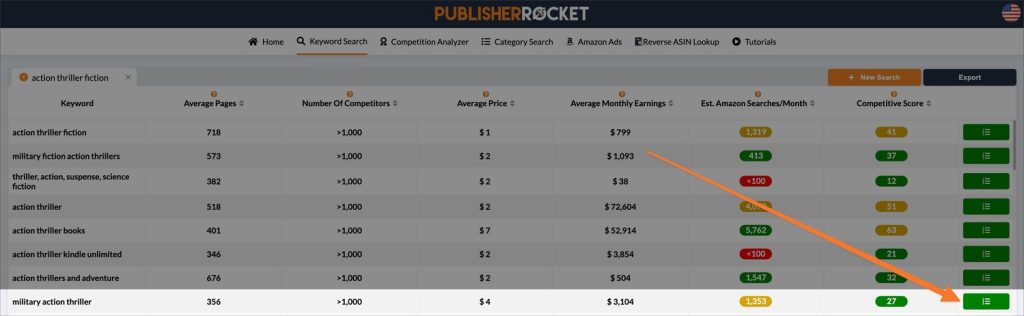
Interesting…
For the “military action thriller” keyword, the competition analyzer shows the $3,104 average for the top books is mostly due to the #1 book’s $5,863 in monthly sales.
The others earn $480, $477, $616, and $403 per month, respectively:
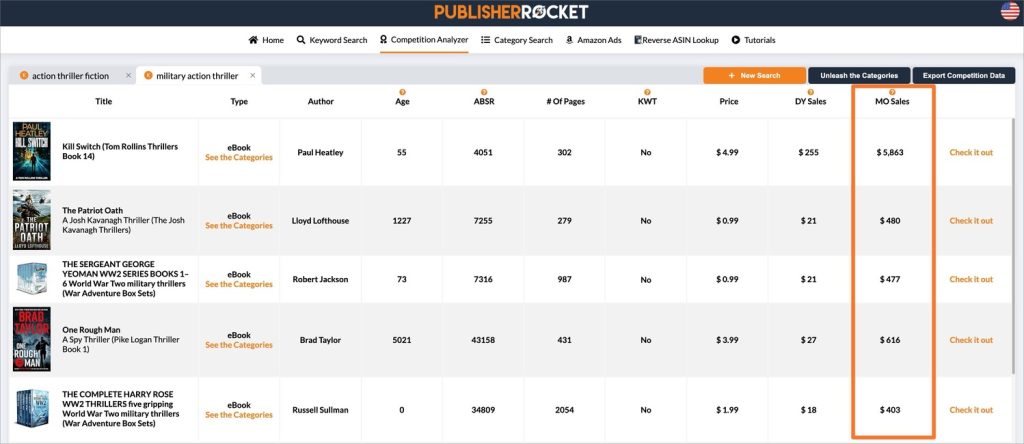
This means the other books in the top 5 average “only” $494 a month.
Still a worthwhile book idea? Well, that’s for you to decide. If you don’t like the numbers, or if you have another idea in mind, start a new keyword search.
Wash, rinse, and repeat until you’ve found (and validated) the perfect idea.
If you need a deeper dive, check out our Book Idea Validation Mastery article.
Otherwise, you’re ready for the next step…
Step 2: Plan your menu (so you don’t have a mess on your hands later)
This step gives beginner writers a clear structure so they’re not making major decisions while drafting.
With a validated idea in hand, many beginner writers feel tempted to jump straight into writing.
But first, you need to craft the outline.
Look at it this way…
Would you run to the kitchen and begin cooking for a huge dinner party before planning the menu?
(Especially if you’ve never thrown a dinner party before?)
Of course not.
You would map everything out. First inside your head, then with pen and paper.
(“How many guests are coming? What are the courses? What ingredients do I need?”)
You would know that failure to plan was a recipe (no pun intended) for a disastrous dinner party, so you would make a plan, even if it was a high-level one, and THEN you would get to work.
Well, what’s true for dinner parties is true for books too.
Outlines help you:
- Organize your thoughts and ideas, so you have a clear roadmap (“menu”) to follow as you write
- Spot holes, inconsistencies, and “missing ingredients” in your (surely) great story (before it’s too late)
- Stay on track and focused on the main points (“dishes”) you want to highlight
In short:
Wolfgang Puck can plan a dinner party without a menu, just like Stephen King can write a novel without an outline. The information is in their brains, and they have decades of experience.
But you, me, and every other beginner writer not blessed with a team of literary agents?
We need menus and outlines.
How to create a simple outline
Open up a blank page in Google Docs and type out every thought you have for your book.
Big ideas. Small ideas. The character development and their arcs. The plot twist that even M. Night Shyamalan wouldn’t see coming.
There’s no structure or rules. Treat it like a creative writing exercise, if that makes things easier.
Just get it all out of your head and into the document.
When you’re finished, it’s possible you’ll have a workable outline as is. But most likely, you’ll need to formalize the ideas you wrote down and turn them into a proper outline.
This guide on book outlines will show you how. It’ll teach you the six different types:
- Mind map
- Synopsis
- Beat sheet
- Skeleton
- Character-led
- Scenes and sequences
If you’re unsure which type of outline to use, go with the most beginner-friendly one: the skeleton outline.
Basically, it’s a bare-bones version of your book idea, but without the juicy details. Think of it as the IKEA furniture of storytelling: you’ve got the key pieces, a rough idea of where they go, and the unspoken understanding that you might have to improvise at some point.
It’s just enough story structure to keep you from wandering off into narrative chaos, but it leaves plenty of room for new ideas and spontaneity in your writing process.
As an example…
Here’s what the skeleton outline would look like for a short story I tell my daughters about a brave knight who travels through three kingdoms so he can defeat an evil dragon:
Sir Kevin, a knight with more optimism than common sense, is tasked with the one thing every medieval hero dreads: saving the world. The evil dragon Denis has decided it’s his turn to be the big bad, and Sir Kevin is the lucky guy sent by Queen Katharine to stop him.
Step one? Find the legendary sword Victus in the Kingdom of Llama. It’s hidden in a cursed forest filled with creatures that seem to exist just to ruin your day.
Step two? Wander into the Kingdom of Alexis to grab the Shield of Hope, which is stuck in a labyrinth designed by someone who really hates knights.
Step three? Head to the Kingdom of Yoto, where Sir Kevin has to convince a bunch of squabbling nobles to play nice long enough to help him defeat the evil dragon.
This basic outline would help me focus on the essential parts of my story: the quest, where the hero goes first, where he goes next, and where he goes last.
Yours will look quite different (especially if you choose a different type of outline), but as long as it…
- helps you visualize the big picture, and
- gives your writing direction
…it’ll do the trick.
Once you have your outline, you’re ready to start writing. But before you do…
Step 3: Choose the right book writing app
This step helps first-time authors avoid technical friction that slows writing and creates problems later.
Yes, writing your entire book in Google Docs is an option.
It’s free, it automatically saves your work, and you can share it with a professional editor, collaborators, etc. without the hassle of emailing files back and forth.
But here’s the thing…
Formatting your book in Google Docs will test your sanity. It’s finicky, time consuming, and the final product will look amateurish compared to the competition.
And since wherever you WRITE your book is where you’ll eventually format and publish it, using software that’s designed for book writing will save you lots of time and headache later.
Here are three top options to consider, along with their prices and platforms:
- Atticus: One-time payment of $147 (works on Mac, Windows, Linux, and ChromeOS)
- Scrivener: One-time payment of $49 for Mac or Windows; $19.99 for iOS devices
- Ulysses: $5.99 per month or $39.99 per year (works only on Mac)
We have an in-depth guide that breaks down the best book writing software, but here’s the TL;DR:
- Atticus is the best all-in-one software for writing and formatting your book
- Both Scrivener and Ulysses have limited formatting capabilities compared to Atticus
- Scrivener isn’t beginner friendly (prepare to buy a course or binge YouTube videos to help you learn how to use it)
- Ulysses only works on Mac and has an ongoing subscription cost
Once you’ve chosen your software, whether that’s Atticus or Google Docs or another option, you’re ready for the final “how to start” step.
Step 4: Write the first line, then the first page, then the first chapter, then…
This is the step that trips up many beginners.
Even with a validated idea…
Even with an outline in hand…
Even with an awesome writing app…
Sitting down and writing a book feels overwhelming.
Some come down with a horrible case of writer’s block. Some have a big writing goal that demands perfection, so they get bogged down in editing before the first draft’s even complete. Others put the weight of the world on nailing their opening line, opening paragraph, and opening chapter.
But here’s why none of that’s going to happen to you:
You’re going to take an incremental approach.
Almost any task, no matter how monstrous or soul-crushing it seems, becomes surprisingly manageable when you break it into bite-sized chunks and start nibbling.
So that’s what you’ll do.
You’ll break down the process of writing a book into tiny pieces.
First, you’re going to write your opening line.
Then you’re going to write your first page.
Then you’re going to write the first chapter.
And then your writing journey will go on from there.
You won’t edit as you go. You won’t agonize over every page, every paragraph, every syllable.
The editing and agonizing will come later in the writing process (after your early drafts are complete and you have a tidal wave of momentum at your back).
For now, just start writing.
Where to go from here
You validate your idea, create an outline, pick software that makes your job easier, and take things one bite-sized piece at a time.
That’s how you get started as a beginner. And when it’s time for you to tackle the next steps…
(Because there are MANY next steps… so many that it's impossible to include them all in a single complete guide…)
We’re to help.
Bookmark this article and come back to it when you’re ready to:
- Edit your book
- Choose your book’s title
- Craft a subtitle that sells
- Settling on a writing style
- Design your book’s cover
- Format your book
- Write your book’s description
- Publish your book on Amazon
- How to go the traditional publishing route
- Build Advanced Review Copy Team and Beta Reader Team
- Market your book
But until then…
You got this.
Good luck and happy writing!


