
Over the past 10 years, I've formatted over 40 books and ebooks for just about every book market and large scale printing press out there.
And I will tell you, formatting your book is simpler than you'd think once you know some of the industry standards. There are some key things you'll need to understand, as well as some pitfalls to avoid. So in this guide, I'll not only help you learn what's most important to formatting a book, but also give you a couple of tips and tricks that will help guide you to making a book you can be proud of.
If there's one thing I've learned consulting publishing companies on book formatting, it's that with some simple tweaks, adjustments, and additions; you can really make a major difference in the book you get, how your readers will perceive you, and how professional you look.
Understanding File Types for Book Formatting
Before we get into the steps to formatting you book, let's first start by discussing the file types you will need to create, as well as give you access to some of the major guidelines out there for the different markets.
To make your life easier, I created a table of all the major publishing platforms and the file formats they accept.
| Platform | EPUB | DOCX | KPF (Kindle Create) | HTML | TXT | Multi-Touch Books (.ibooks) | |
|---|---|---|---|---|---|---|---|
If looking at this table makes your head spin, don’t worry, I get it. The primary columns you need to pay attention to are EPUB and PDF because all the markets you care about recommend those.
I've got a whole article on this for you to check out. But the bottom line is this:
- If you’re creating an ebook, then an EPUB will be your go-to.
- For print, you’ll notice that every print-on-demand platform accepts one file format: PDF.
EPUB is the current industry standard for ebooks. Most retailers now expect modern EPUB files (commonly EPUB 3), and most formatting software automatically handles this for you. You don’t need to worry about versions. Just know that EPUB is the format you should be using going forward.
Novel formatting guidelines
The below are links that I think are important, however, there is no need to go through each and everyone of them. Because what I will teach you below incorporates all of the below information into it. So, just think of this as a reference point in case you want to dig deeper.
| Amazon | e-Book Guidelines | Paperback Guidelines |
| IngramSpark | e-Book Guidelines | Paperback Guidelines |
| Barnes & Noble Press | e-Book Guidelines | Paperback Guidelines |
| Apple Books | e-Book and Multi-Touch Guidelines | |
| Google Play | e-Book Guidelines | |
| Kobo | e-Book Guidelines | |
| Lulu | e-Book Guidelines | Paperback Guidelines |
Step 1: Decide How You Will Go About Formatting
Over the years, I’ve experimented with just about every way there is to format a book. I’ve hired professional formatting services, used dedicated formatting software to do it myself, and yes… I’ve even wrestled with Word documents.
Before you jump into the formatting process, it’s worth taking a moment to look at the different options available so you can choose the path that makes the most sense for you.
That said, no matter which route you take, the steps that follow are still important to understand, even if you decide to hire someone else to handle the formatting. Knowing what goes into proper formatting helps you evaluate the final product, make sure your book meets industry standards, and ensure the service you hired actually delivered what your book needs.
Option A: Using a book formatting service
I do not recommend using a service. First, you're either going to have to pay over $1,000 in order to get a incredibly well done book. You could go with some of the cheaper options out there for around $200, but be careful. As I've found, most of those services are as basic as they come. Also, ensure that if you pay for a service, that you at LEAST get both ebook and print book files back (in the right file format as I discussed above).
Also, ensure it includes a certain number of edits. I swore off of using formatting services after I had a book go out, and needed to update the back matter of a previous book, and they wanted to charge me the $250 again…just to edit a couple of pages. On the one hand, I don't blame them but on the other hand, that's ridiculous.
If you do choose to use a book formatting service though, here is a list of possible ones to check out.
Option B: Using a book formatting software
Back in the day, most of the book formatting software was extremely difficult to use and required a steep learning curve. However, that is no longer the case.
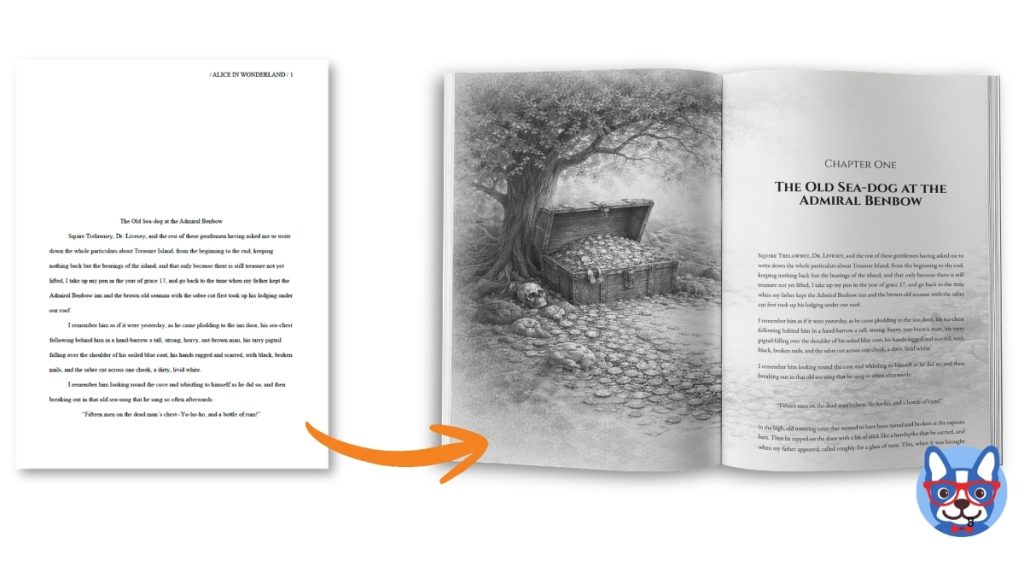
There are many book formatting tools that are super intuitive, and allow you to make incredible looking books. As you can see below, there is a stark difference between ‘just formatted' and ‘professional looking'. And to the create the book on the right only took a couple of extra minutes to do.
There are a couple of reasons why you should consider using a software to build your book yourself:
- The best option software only costs $147 and that's for life. That means you'll save having to pay a service over $200 or more for every book you publish. That can really add up!
- If you ever need to make an edit to a previously formatted book, you'll have to pay the service again. Not with software.
- Formatting yourself with a software is actually very easy and takes a lot of the guesswork out of it all.
So, if you're looking to use a software, here are the best options ranked, and includes a link to where you can learn more
| Rank | Tool | Ease of Use | Capability | Cost | Check It Out |
|---|---|---|---|---|---|
| 1 | Atticus | Easy | Medium |
| |
| 2 | Adobe InDesign | Difficult | High (you can make anything) |
| |
| 5 | Microsoft Word | Medium | Low |
| |
| 3 | Vellum | Easy | Medium |
| |
| 6 | Kindle Create | Easy | Low |
|
I have used every one on that list, and my favorite is Atticus. It's one of the cheapest and easiest to use, and includes amazing support and tutorials. Plus, with all the different capabilities it offers, you can format your book into something you're proud of in no time. Combine that with it being over $100 cheaper than Vellum and offering more, you can see why its one of the fastest growing tools for authors.
While Atticus can handle what most authors will need and then some, there are certain types of books that will need something more sophisticated, like textbooks or the sorts. That's when InDesign would be the best option. However, this is super complicated to learn and will require courses in order to figure it out. When I used it, it was a bear to go through.
What about Using Word to Format? You most definitely can, and like I said above, I have gone through that process extensively. As a matter of fact, I wrote a full article on how you can format a book using word, and I even created free templates for word formatting you can use to help you format.
However, even with my training and the free templates, you will find it is a bit complicated, and requires a lot of time to make sure what you created is good enough. Furthermore, you'll find that many things you want to do, or change so that your book looks great will be hindered.
So again, formatting your book with Word is definitely an option, but not something I'd recommend.
Step 2: Creating Your Front and Back Matter
Now that we've established your path for formatting, let's discuss certain sections or parts of a book that you should think about. Other than the main body of the book, there are two major sections: Front Matter and Back Matter:
Front matter
The front matter consists of the very first pages, like a title page and table of contents.
Some books have just a few pages, while others have substantial front matter that requires a separate numbering system (usually roman numerals).
You’ll have to decide how much front matter to include. It will depend on the type of book you wrote and your personal preference. Nonfiction often has more than fiction, and most books have a minimum of a title page and a copyright page.
Front matter can include any (or all) of the following:
- Title page
- Dedication page
- Copyright page
- Praise or accolades (optional)
- Table of contents
- Maps or illustrations
- Epigraph
- Foreword
- Preface
- Prologue
Back matter
The back matter makes up the final pages, such as the acknowledgments and an about the author page. Once again, you have some flexibility on what to include. The type of book you wrote will also factor into how much back matter you need. At a minimum, you should have an “Acknowledgments” page and an “About the Author” page.
Here are some things you’ll find in the back matter:
- Acknowledgments
- About the author
- Afterword
- Appendix
- Note from the author (optional)
- Discussion questions (optional)
- Glossary (optional)
- Indexes
- Bibliography
- Sneak peaks
- Other books by the author
Step 3: Rules and Guidelines for eBook Formatting
Formatting ebooks is a relatively simple process with the right software. There are many aspects of formatting that you don't have to worry about with ebooks, such as fonts (since ereaders have their own fonts), trim sizes, margins, etc.
That said, there are a few things to keep in mind when formatting for ebook. Here are a few:
- Page Breaks: Ensure that page breaks are strategically placed to enhance readability, such as between chapters or distinct sections within your ebook. This will help to create the Table of Contents later.
- Chapter Heading Fonts: These are a chance to use unique and stylish fonts to set the tone for your scenes. They should be distinctive and easily recognizable, helping readers navigate through the book with ease. The same font should be used for all chapter headings to ensure consistency.
- In-text formatting: Careful formatting within the text for things like headings, bulleted lists, etc. improves readability and helps to clearly convey information, particularly in non-fiction works.
- Indented or Spaced Paragraphs: Decide on a consistent style for your paragraphs – either use indentation for the first line, or space between paragraphs – and stick with it throughout the book.
- Curly Quotes vs Straight Quotes: While curly quotes (“smart quotes”) are often seen as more professional, ensure you choose one style and use it consistently.
- Adding Links: Consider adding hyperlinks in your text, either to external sources or internal references within your book, to create an interactive reading experience. Links are not possible in print books, and so it's something ebooks can really take advantage of.
- A Digital Table of Contents: This is an essential feature that allows readers to navigate easily to different sections of the ebook, especially in lengthy works or textbooks. Each line on the digital Table of Contents, instead of showing a page number, should link to the appropriate chapter.
- Basic accessibility considerations: Simple things like properly structured headings and descriptive text for images help ebook devices and screen readers interpret your book correctly. Most modern formatting tools handle this behind the scenes, but it’s another reason to avoid manual formatting shortcuts.
- Scene Break Ornaments: This is an essential feature that allows readers to navigate easily to different sections of the book, especially in lengthy works or textbooks. A good formatting program (like Atticus) will give you full control over the design of these breaks.
- Endnotes: If your ebook contains references or additional information, using endnotes can keep the main text uncluttered while providing readers the option to delve deeper into the subject matter. Note that only endnotes (and not footnotes) are possible in an ebook format. You can position them at the end of each chapter or all together at the end of the book.
That might sound like a lot, but it's also easy to do with a formatting tool like Atticus, which makes all of that possible with just a few clicks. That can be a HUGE time saver for some of these, especially aspects like the digital Table of Contents or setting up Endnotes.
One optional step if you’re publishing wide is to run your EPUB file through a validator before uploading. This can catch small structural issues that don’t always show up visually but can cause problems on certain platforms. It’s not required, but it can save time if a retailer flags your file later.
Step 4: Rules and Guidelines for Print Book Formatting
Open up your book formatting software, start a new document and let’s get going.
1. Set the margins and bleeds
Margins: Margins are the blank areas around the edges of the page. For most books, a 1” margin works best. It gives you enough room to add page numbers and a header without the page getting crowded. It’s also essential to have enough white space on the page so that your reader’s eyes don’t get tired as quickly.
Bleeds: If you have any image or color that extends to the edge of the page, you need to add a bleed. It is a small border that stretches past the edge of your document.
When your book gets manufactured, the printer lays out several pages on one large sheet of paper and then trims them down to the finished size. Having a bleed prevents printing and trimming errors that result in unexpected white lines along the edge of your page.
Set your bleeds to 0.125”.

2. How to use headers, footers, and page numbers
- Page numbers
- Book title
- Author name
- Chapter title
- Point of view – If your book has multiple points of view, some authors like to include which character is currently narrating in the header.
Footers go in the bottom margin of your book and usually only include the page number. With nonfiction, footers can also include footnotes.
Page numbers go in either the header or footer, but not both. They are only included in the body of the book, not in the front matter or back-matter.
Some authors use roman numerals in their foreword or introduction. This practice identifies lengthy font matter as separate from the main body text.
3. Choose the best font for your book
Now that you have your file set up, you’re ready to choose a font for your book.
Resist the urge to use an unconventional font for the body text. Your goal is to create a comfortable reading experience, so choose a font that’s easy to read. It may not be exciting, but your reader will thank you.
Save the fun and fancy fonts for chapter headings and elements like handwritten notes.
Here are some fonts that are great for body text:
- Joanna MT
- Garamond
- Baskerville
- Cochin
- Arial
- Times New Roman
- Georgia
- Verdana
- Set your font size to 11 or 12
With children’s books, you can get away with larger font sizes. Large print books need a font size of at least 14.
Nonfiction books can have a font size of 10 or 11. Any smaller than that, and it will be too hard to read.
Tip: Be sure to examine the copyright on your fonts before you use them. Many fonts require that you buy a commercial license before you can use the font in a digital or physical product. You’ll also want to make sure your fonts are properly embedded in the final file so they display correctly across different printers and devices. Most professional formatting tools do this automatically, but it’s something to watch for if you’re exporting files manually.
4. Indents, spaces, and rags
The next thing you need to do is style your pages to make them look professional. You can do this by formatting your indents and spaces while avoiding rags.
If you’re using a tool like Atticus, the settings are already in place, and you won’t need to do anything. But with some programs, you’ll need to set them yourself.
Indents: In fiction or narrative nonfiction, always indent the first line of a paragraph. The first paragraph of a chapter or after scene breaks are the only times you shouldn’t indent.
Pressing the tab key will usually result in an indent that's too large. You can fix this by setting your indent to 0.3” or 0.5”.
Line Spacing: Set your line spacing to 1.3.
You need enough space between lines so that your reader can keep their place. You can go a little smaller (1.2) for nonfiction and a little bigger (1.5) for children’s books.
Tip: While we’re talking about space on the page, it’s time to ditch the double space after a period. Just use one.
Rags: Rags happen when you use a left or right alignment, resulting in an uneven margin or “rag” on the side of the page. Instead, use the justify alignment for the body text. It will add hyphens to some of your long words and make them fit nicely within the margins.

5. Watch out for widows and orphans
Widows and orphans are words that become detached from their paragraph or page. Where possible, try to avoid these. By making very slight adjustments to your margins, line height, or letter-spacing, you can keep your paragraphs looking clean and professional.

Tip: This only applies to printed books. You can’t reliably control widows and orphans in ebooks because every reader’s device settings will affect how the text reflows.
Please note that when I first formatted a book, I totally didn't understand this concept, and it showed in the reviews. I've never really noticed them before, however, steely eyed readers were not happy that I hadn't respected this principle or ‘industry standard.'
Check out my dedicated article to widows and orphans here.
6. Use page breaks correctly
Rather than hit enter multiple times between chapters, you'll want to use a page break instead. This will cut the chapter off so that the next chapter will always start on the next page.
Software like Atticus and Vellum will do this for you automatically. If you are using Word, you can click “Insert > Break > Page Break” to get the appropriate effect.
Step 5: Picking the Best Trim Sizes for your Book
A smaller trim size can result in a higher page count, so you’ll need to consider that when you’re setting up your book. If you wrote a long book and want to lower your page count, choose a larger trim size (and vice versa).
This chart can help you decide which trim size is best for your project.
| Trim size | This size works for: |
| 4.25 x 6.87” | Mass market paperbacks (like the ones you see in the grocery store or airport) |
| 5 x 8” or 5.25 x 8” | Trade paperbacks (like you see in bookstores) |
| 6 x 9” or 6.25 x 9.5” | Hardcover books and paperback graphic novels |
| 8 x 8 or 8 x 10 | Children’s picture books |
| 8 x 10 or 8.5 x 11 | Coffee table books, picture books, activity books, cookbooks, crafts books, and coloring books |
Most companies will offer more trim sizes than the ones listed here. If you’re not sure what size is best for your project, grab a ruler and head to your bookshelf. Measure some books that are similar to yours, and pick a comparable book template.
And check out my comprehensive article on trim sizes.
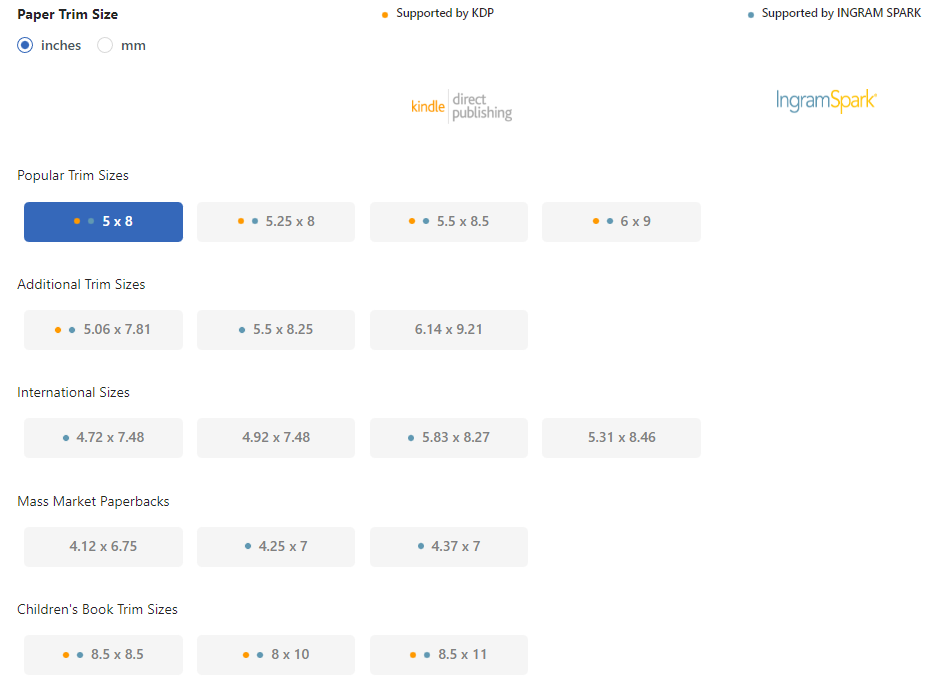
If you're using a program like Atticus, you'll have access to a wide variety of trim sizes at the touch of a button, with sizes for both Kindle Direct Publishing (KDP) and IngramSpark.
BONUS: How to Design Amazing Chapter Pages
At a minimum, you should include the following on your chapter pages:
- The chapter number.
- Chapter title (if applicable).
- The subtitle or Epigraph (if applicable).
It might be tempting to add a bunch of embellishments to your chapter pages. But don’t go overboard. When it comes to design, less is more. Try to balance something ornate with something simple.
Here are some guidelines for designing chapter pages:
- Start your body text about halfway down the page.
- Center the chapter heading in the top half of the page.
- Don’t indent the first paragraph.
- You can use a drop cap or make the first line all caps, but it’s not required.
- Omit headers and footers.
- Page numbers are optional.
- Use the same font for your chapter headings that you used on the cover unless it’s too difficult to read. If that’s the case, find one that’s easy to read but different from the body text.
- For children’s and young adult novels, you can get more creative with chapter pages. Add illustrations, a frame around the chapter heading, or a design element in the background.
- For adult novels and nonfiction books, keep it simple. A small embellishment or a drop cap will add some flair, but don’t go crazy with the design elements.
Tip: Except for children’s and young adult novels, you should balance something ornate with something simple. If you use a fancy font for your chapter heading, skip the drop cap. If you have an illustration, keep the rest of the page simple.
Here are some examples of well-designed chapter pages.
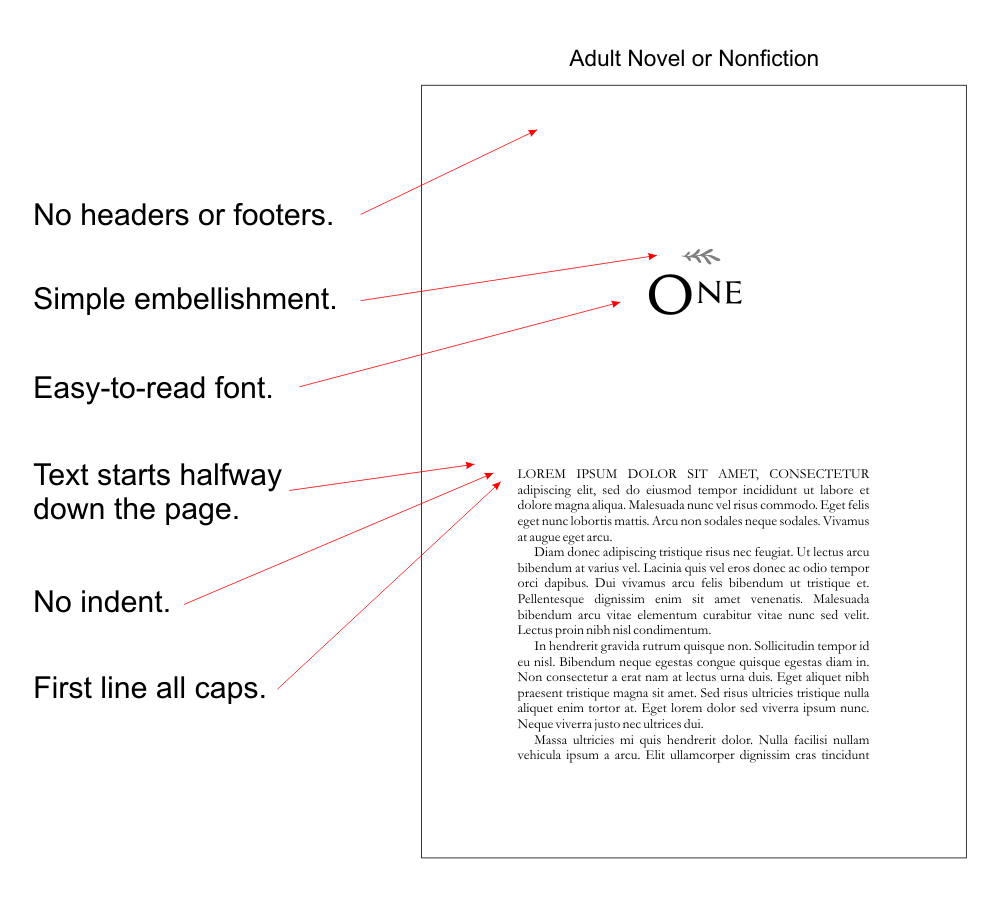
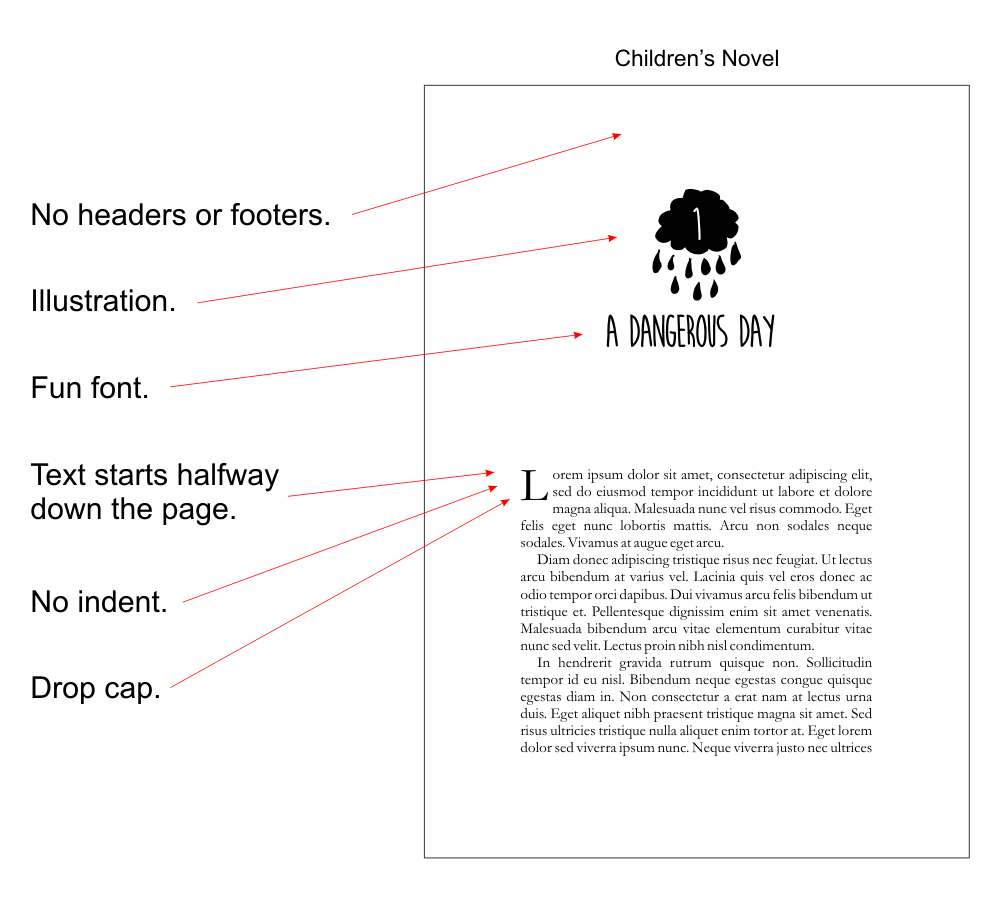
Keep in mind that these are just two examples of chapter pages. You have a lot of options when it comes to designing these pages, so feel free to experiment. Just remember to keep them simple. You want them to add to your story, not distract from it.
That said, you can have more extensive chapter themes with background images and different fonts to set the tone of the book. See this chapter theme as a great example of what's possible with a program like Atticus:

So, Let's Get Started!
Okay, well there you have it. We just went through some of the more important aspects for formatting, given a step by step process and hopefully I've given you a couple of ideas on how you want to craft and form your next book.
I can't stress enough though that you should avoid services and instead get a book formatting software and turn your book into something representative of your art. You'll not only save in the long run, but will craft something you'll be even more proud of.
And, like I said, my absolute favorite software for this is Atticus. It's not only the cheapest in its class, but gives you access to it for life. So, be sure to check that out.


